
 |
This approach to running TestComplete tests on remote computers is obsolete. We do not recommend using it. Starting from version 14.20, to run TestComplete tests remotely on computers where Visual Studio is not installed, you can use the new integration. To learn more, see Integration With Azure DevOps and Team Foundation Server. |
You can include TestComplete tests in Visual Studio test projects and run them remotely on computers where Visual Studio is not installed by using Visual Studio Test Agents.
For more information on test agents, see Setting Up Test Machines to Run Tests or Collect Data in the MSDN Library.
 1. Adding TestComplete Tests to Visual Studio Test Project
Requirements
The computer where you create tests, and the computers where the tests will run must have the following software installed:
The Computer Where You Create and Configure Test Projects
-
One of the following versions of Visual Studio:
-
Microsoft Visual Studio 2015–2019 (Enterprise or Professional edition).
-
Microsoft Visual Studio 2010–2013 (Ultimate, Premium, or Professional edition).
-
-
TestComplete 14.
-
TestComplete 14 Visual Studio Integration Package.
The Integration Package installer is shipped along with TestComplete. You can find it in the TestComplete folder after installing the product:
<TestComplete 14>\VS Integration\VSIntegration.exe
Run this installer after installing TestComplete on the computer, where you will create and configure tests. In the installation wizard, select the Visual Studio Integration feature corresponding to your Visual Studio version.
Test Controller
|
Test agents for Visual Studio 2015 do not support running functional tests remotely from Visual Studio. To run tests, use test controllers and test agents for Visual Studio 2013. You can find more information on it in the MSDN Library.
|
 To Get Test Controllers and Test Agents for Visual Studio 2013
-
Microsoft Test Controller for Visual Studio.
-
TestComplete 14 (or TestExecute 14).
-
TestComplete 14 Visual Studio Integration Package.
The Integration Package installer is shipped along with TestComplete. You can find it in the TestComplete folder after installing the product:
<TestComplete 14>\VS Integration\VSIntegration.exe
Run this installer after installing TestComplete . In the installation wizard, select Build and Test Integration or Test Agent Integration feature appropriate for your test controller version.
Remote Computer Where Tests Will Run
-
Microsoft Test Agent for Visual Studio.
-
TestComplete 14 (or TestExecute 14).
-
TestComplete 14 Visual Studio Integration Package.
To learn how to install the package, see the instructions for test controllers above.
Before You Start
-
A Visual Studio test project stores relative paths to TestComplete projects or project suites to be run.
When remote testing starts, the Visual Studio project is copied to a temporary folder on a remote computer where the tests will run. This can cause a situation when a relative path to the needed TestComplete project suite does not correspond to the actual location of the project suite.
To avoid this issue and run TestComplete tests on remote computers successfully, make sure that your TestComplete project suite files are located in a proper folder and the relative path to the project suite files that Visual Studio test project specifies is valid.
You can do it in one of the following ways:
-
Configure your Visual Studio test project to manage your TestComplete project suite files (we use this approach in the instructions given in this topic).
– or –
-
Create a script that will copy your TestComplete project suite files to the proper folder on the remote computer. To run the script upon the test start, open your Visual Studio test project’s settings in the Test Settings dialog and specify the created script as the Setup script for your test project on the Setup and Cleanup Scripts page of the dialog.
-
-
You cannot add TestComplete tests to Visual C++ unmanaged (native) test projects.
As a workaround, we suggest that you add a test project of any other type (for example, a Visual C++ Managed Test project) to your solution in Visual Studio and run TestComplete tests from that project.
1. Adding TestComplete Tests to Visual Studio Test Project
-
Launch Microsoft Visual Studio.
-
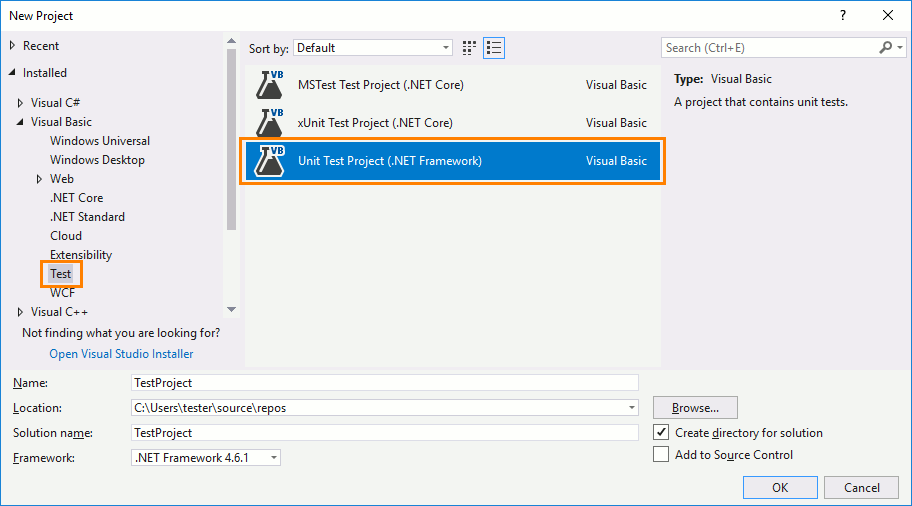
Open your Visual Studio test project or create a new one:
-
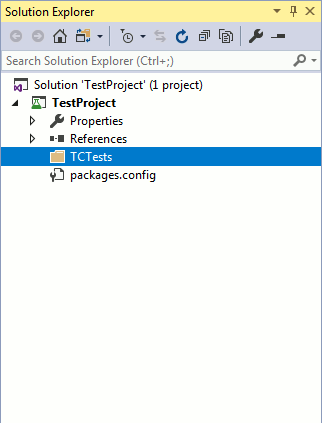
In the Visual Studio Solution Explorer, add a new folder to your Visual Studio test project:
-
Right-click the folder and select Open Folder in Windows Explorer from the context menu. This will open the folder you created in Windows Explorer.
-
Place your TestComplete project suite files to the folder.
-
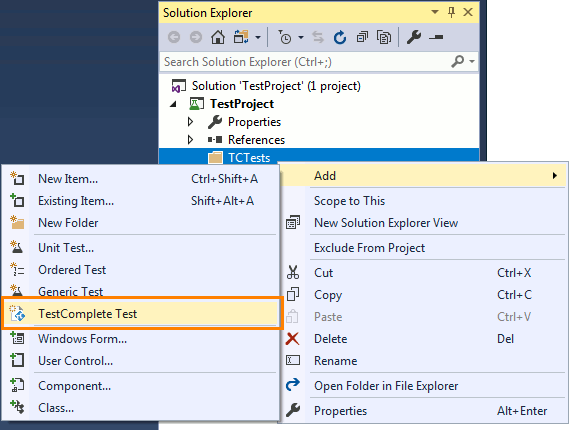
In Visual Studio Solution Explorer, add a new TestComplete Test item to the folder:
-
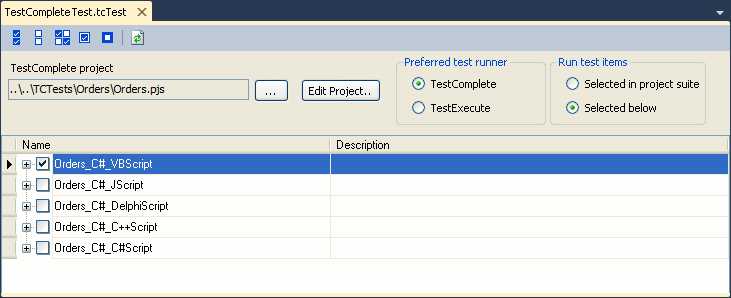
Configure the added TestComplete Test item to run the TestComplete project suite located in the created folder:
-
Save the changes.
2. Configuring Test Settings for Remote Execution
-
In your solution (Visual Studio 2012 - 2019) or in your project (Visual Studio 2010), open the test settings file you want to configure or create a new test settings file.
-
On the General page of the Test Settings dialog, specify a name for the test settings.

-
On the Roles page of the dialog:
-
In the Test execution method drop-down list, select Remote execution.
-
In the Controller drop-down list, select a controller for the test agents you want to use.
-
In the Roles table, click Add to add a new role. Type the role’s name in the Name column.
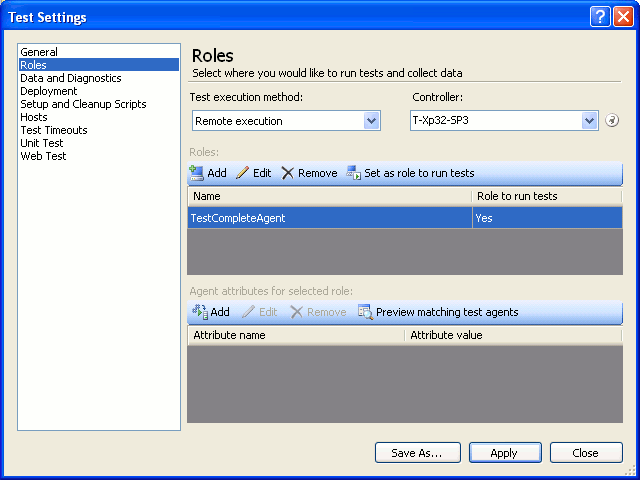
-
Select the role you want to run your tests with and click Set as role to run tests. If you have a single role defined, it will run the tests by default.
-
To specify test agents that will be used for running tests, in the Agent attributes for selected role table, create attributes for the role, and then assign these attributes to your test agents.
-
-
On the Deployment page of the dialog:
-
Select the Enable deployment check box.
-
Click Add Directory and add the folder containing your TestComplete Test item to the list of files and directories to deploy.
-
-
Specify other settings if you need to. For more information on modifying settings to run tests remotely, see Specifying Test Settings for Visual Studio Tests article in the MSDN library.
-
Click Apply to save the settings and close the dialog.
-
Apply the created test settings to the project:
In Visual Studio 2012 – 2019, select the needed test settings in the Test | Test Settings menu.
In Visual Studio 2010, select the needed test settings in the Test | Select Active Test Settings menu.
3. Running a Test Project and Viewing Test Results
-
After you have modified the test settings for remote execution and applied them to your solution, run the tests:
In Visual Studio 2012 – 2019
-
Select Test | Window | Test Explorer from the main menu to open Test Explorer.
-
In the Test Explorer, right-click your TestComplete Test item and select Run Selected Test from the context menu.
In Visual Studio 2010
-
Select Test | Windows | Test List Editor from the main menu to open Test List Editor.
-
In the Test List Editor, create a new list of tests.
-
Add your TestComplete Test item to the new list of tests. Check the test to enable it.
-
Run the test by clicking Run Checked Tests on the Visual Studio toolbar.
-
-
The test controller specified by test settings will process the test project and run it on an appropriate test agent. The test agent will launch TestComplete (or TestExecute) and run the selected TestComplete project. You can select the corresponding test controller in the Connect drop-down list and watch the test progress.
Note: If the 64-bit version of TestComplete/TestExecute is available on a machine, it will be used to run tests. Otherwise, the 32-bit version will be used. 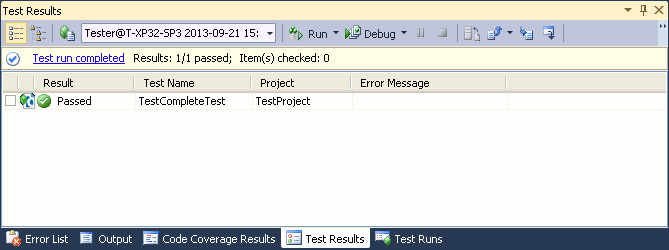
-
After the test run is over, the Test Results panel displays the results of the TestComplete Test item.
See Also
(Obsolete) Integration With Azure DevOps and Team Foundation Server via TCTest Item
Prepare TestComplete Project for Integration
Add TestComplete Tests to Visual Studio Test Projects