You can add TestComplete projects and project suites to Visual Studio test projects and run TestComplete tests from Visual Studio in the same way you run native Visual Studio tests.
 Requirements and prerequisites
1. Prepare your TestComplete project
2. Add your TestComplete project to a Visual Studio test project
Requirements and prerequisites
You must have the following software installed on your computer:
-
One of the following Visual Studio versions:
-
Microsoft Visual Studio 2015–2019 (Community, Enterprise or Professional edition).
-
Microsoft Visual Studio 2013 (Community, Ultimate, Premium, or Professional edition).
-
Microsoft Visual Studio 2010–2012 (Ultimate, Premium, or Professional edition).
 Integration with Visual Studio 2010–2013 has become obsolete. It will be removed in one of the future releases.
 -
-
TestComplete 14 (or TestExecute 14).
-
TestComplete 14 Visual Studio Integration Package.
The Integration Package installer is shipped along with TestComplete. You can find it in the TestComplete folder after installing the product:
<TestComplete 14>\VS Integration\VSIntegration.exe
Run this installer after installing TestComplete on your computer. In the installation wizard, select the Visual Studio Integration feature appropriate for your Visual Studio version.
For detailed instruction on installing the integration package, see Install Integration Package.
1. Prepare your TestComplete project
-
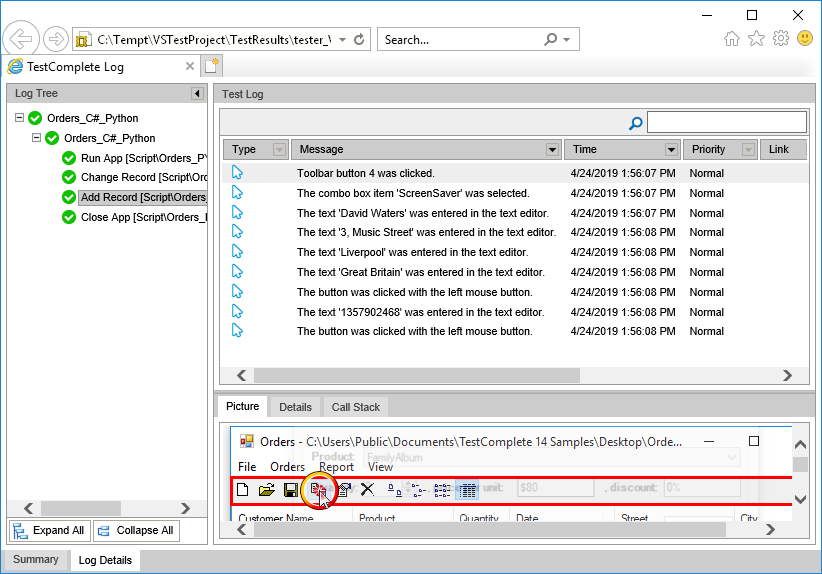
In your TestComplete project, create tests. You can record needed test actions or create them from scratch. See Creating Tests.
-
Organize a test run sequence on the Test Items page of your TestComplete project:

2. Add your TestComplete project to a Visual Studio test project
-
Launch Visual Studio.
-
Open your Visual Studio test project or create a new one:
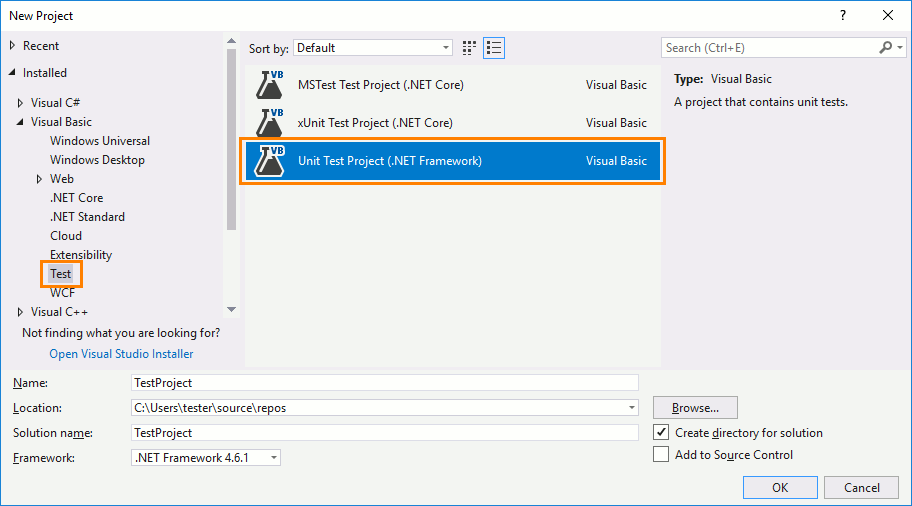
Note: You cannot add TestComplete tests to Visual C++ unmanaged (native) test projects. As a workaround, we suggest that you use a test project of any other type (for example, a Visual C++ Managed Test project) to keep TestComplete tests.
-
Right-click your project in the Solution Explorer, and then click Add > TestComplete Test:

– or –
Right-click your project in the Solution Explorer, and then click Add > New Item. Visual Studio will display a dialog with available item types. In the dialog, select the TestComplete Test type:

Specify the needed test name and click OK.
-
Visual Studio will create a new test of the TestComplete Test type and add it to the project:

-
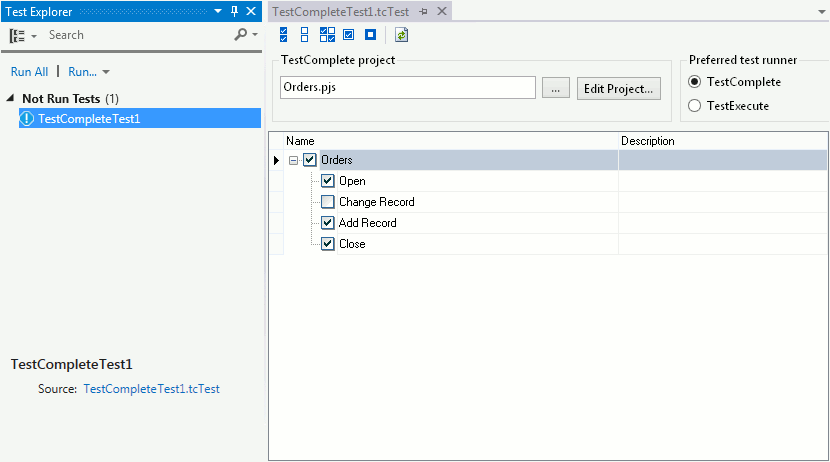
Configure it to run the needed TestComplete tests:

-
Double-click the TestComplete Test node in the Solution Explorer. Visual Studio will open it in the TestComplete Test editor.
-
In the TestComplete project box, click the ellipsis button and browse for the TestComplete project or project suite file that contains the tests you want to run.
-
The editor will show a tree-like structure of available test items:
By default, the structure and selection of items coincide with the structure and selection stored in your TestComplete project or project suite.
-
To run test items selected in the project suite, click Selected in project suite in the Run test items section.
To select needed tests items manually, click Selected below in the Run test items section and select the needed items in the test items tree. To select and unselect items, you can also use buttons on the toolbar at the top of the editor.
-
In the Preferred test runner section, choose the application (TestComplete or TestExecute) that you want to use to run tests. If only one of the applications is installed on the computer where the test project is run, the corresponding test runner is selected automatically.
-
-
Save the changes.
3. Run TestComplete tests and view test results
-
Select Test > Windows > Test Explorer from the Visual Studio main menu to open the Test Explorer.
-
The panel displays the list of available tests including TestComplete Test (you may need to build your test project first to populate the list with tests).
-
Right-click it and then click Run Selected Test.
-
Visual Studio will run the test item. The item will launch TestComplete (or TestExecute), load the specified TestComplete project suite and run the selected tests.
Note: If the 64-bit version of TestComplete/TestExecute is available on a machine, it will be used to run tests. Otherwise, the 32-bit version will be used.
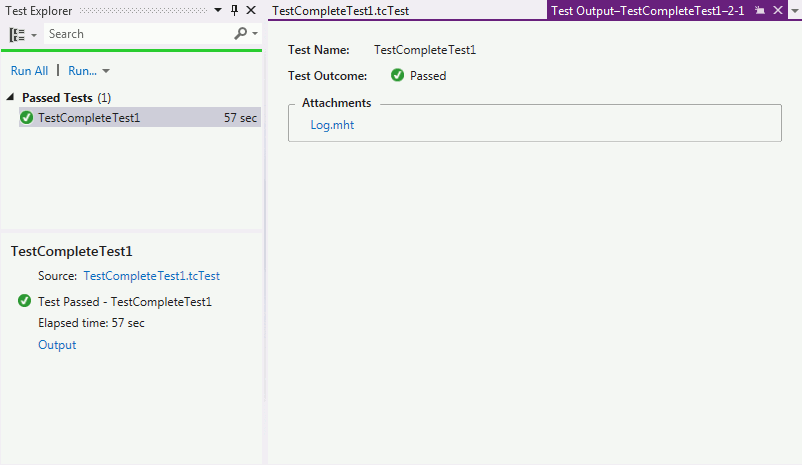
After the test run is completed, Visual Studio displays the TestComplete Test item results:

To view detailed output of a TestComplete test:
-
Click Output in the summary pane at the bottom of the Test Explorer panel.
-
Visual Studio will display the test output with the attached TestComplete test log.
-
To open the log, click the link to it in the Attachments section: