
You can add TestComplete projects and project suites to Visual Studio test projects and run TestComplete tests from Visual Studio in the same way you run native Visual Studio tests.
This topic provides a step-by-step description of how you can integrate TestComplete tests into Visual Studio test projects and run them locally in Visual Studio.
 Requirements and Prerequisites
Requirements and Prerequisites
You must have the following software installed on your computer:
-
One of the following Visual Studio versions:
-
Microsoft Visual Studio 2015–2019 (Community, Enterprise or Professional edition).
-
Microsoft Visual Studio 2013 (Community, Ultimate, Premium, or Professional edition).
-
Microsoft Visual Studio 2010–2012 (Ultimate, Premium, or Professional edition).
 Integration with Visual Studio 2010–2013 has become obsolete. It will be removed in one of the future releases.
 -
-
TestComplete 14.
Install TestComplete 14 Visual Studio Integration Package on your computer:
The Integration Package installer is shipped along with TestComplete. You can find it in the TestComplete folder after installing the product:
<TestComplete 14>\VS Integration\VSIntegration.exe
Run this installer after installing TestComplete on your computer. In the installation wizard, select the Visual Studio Integration feature appropriate for your Visual Studio version.
Limitations
You cannot add TestComplete tests to Visual C++ unmanaged (native) test projects.
As a workaround, we suggest that you add a test project of any other type (for example, a Visual C++ Managed Test project) to your solution in Visual Studio and run TestComplete tests from that project.
1. Add TestComplete Tests to Visual Studio Test Project
-
Launch Visual Studio.
-
Open your Visual Studio test project or create a new one:

-
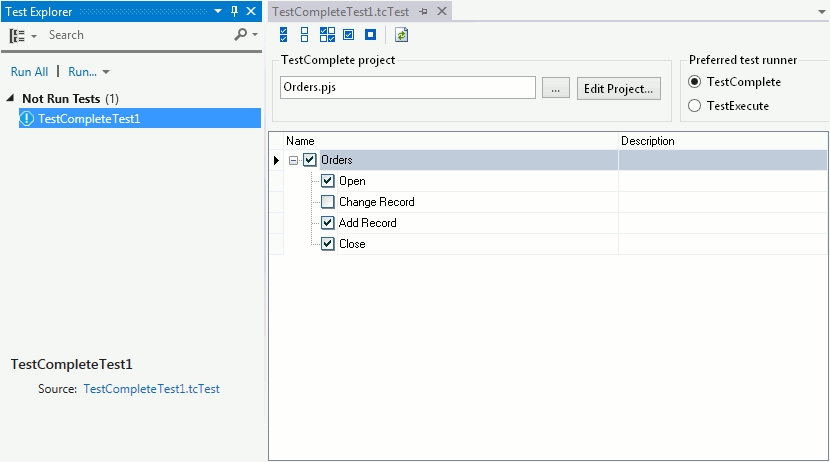
Add a TestComplete Test item to your Visual Studio test project:

-
Configure it to run the needed TestComplete tests:

For detailed instructions on how to do this, see Add TestComplete Tests to Visual Studio Test Projects.
2. Run TestComplete Tests
In Visual Studio 2012–2019
-
Open the Test Explorer panel. To open the panel, choose Test | Windows |Test Explorer from the main menu of Visual Studio.
-
The panel displays the list of available tests including TestComplete Test (you may need to build your test project first to populate the list with tests).
-
Right-click it and then click Run Selected Test.
-
Visual Studio will run the test item. The item will launch TestComplete (or TestExecute), load the specified TestComplete project suite and run the selected tests.
Note: If the 64-bit version of TestComplete/TestExecute is available on a machine, it will be used to run tests. Otherwise, the 32-bit version will be used.
In Visual Studio 2010
-
Choose Test | Windows | Test List Editor from the main menu of Visual Studio.
-
In the Test List Editor panel, place the TestComplete 14 test item in the needed category and enable it for execution.

-
Click
 Run Checked Tests on the Visual Studio toolbar.
 -
Visual Studio will run the test item. The item will launch TestComplete (or TestExecute), load the specified TestComplete project suite and run the selected tests.
Note: If the 64-bit version of TestComplete/TestExecute is available on a machine, it will be used to run tests. Otherwise, the 32-bit version will be used.
3. View Test Results
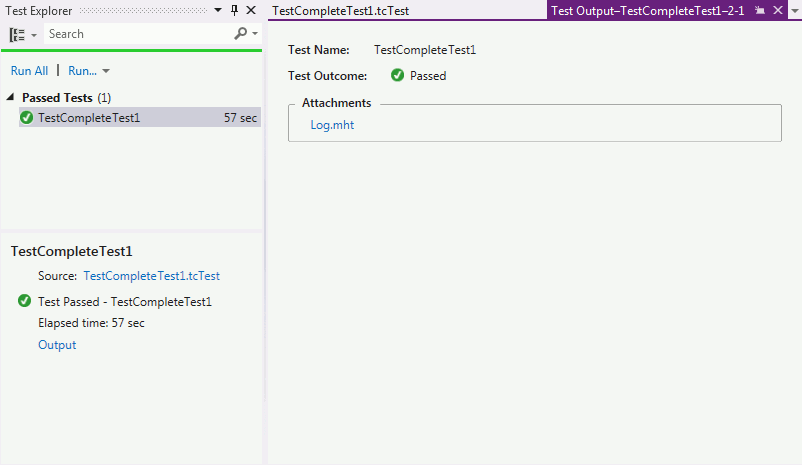
After the test run is completed, Visual Studio displays the TestComplete Test item results:
In Visual Studio 2012–2019
The results are displayed in the Test Explorer panel.

To view detailed output of a TestComplete test:
-
Click Output in the summary pane at the bottom of the Test Explorer panel.
-
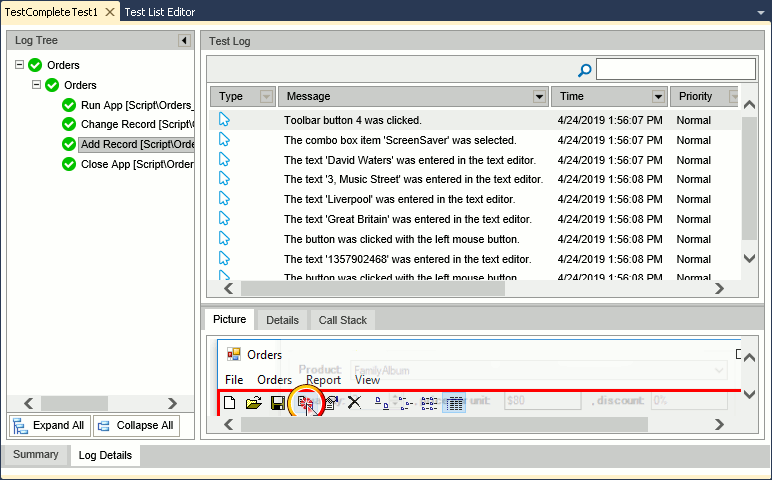
Visual Studio will display the test output with the attached TestComplete test log.
-
To open the log, click the link to it in the Attachments section:

In Visual Studio 2010
The test results are displayed in the Test Results panel.

To view a detailed output of a TestComplete test, double-click the test item in the Test Results panel. Visual Studio will open the TestComplete test log:
If you have Team Explorer installed and a connection to your Azure DevOps Server or Team Foundation Server is established, you can also publish the test results to your server database:
-
Select the desired test results in the panel.
-
Click Publish on the panel toolbar.
See Also
(Obsolete) Integration With Azure DevOps and Team Foundation Server via TCTest Item
Add TestComplete Tests to Visual Studio Test Projects