
On this page of the Record Test wizard, you can specify the tested application and its launch settings:

Click the image to enlarge it.
 Web
WebWeb
Select Web to test web pages that are shown in one of the supported web browsers.
Requirement: the Web module.

-
Select the browser you want to use for recording (the browser must be installed on your computer).
-
In the URL text box, enter the URL of the web page to start testing from. TestComplete will open this page when you start recording, and the first command in your recorded test will be the command that navigates to this page.
If you keep this text box empty, the test will start from your browser’s start page, or from the currently open page (not recommended, see below why).
-
We recommend that you select the Restart the selected browser check box (it is visible if TestComplete detects the supported browser is running).
In order for the recorded test to run successfully, the state of your web application at the beginning of the test run must be the same as it was at the beginning of test recording.
Note: TestComplete will restart the selected browser only. The other browsers will continue running. -
To start recording a test, click Record. TestComplete will display the web browser and open the specified URL in it. You can then work with the page as usually: enter text, click links, and so on. TestComplete will record your actions as test commands.
Related topics of interest
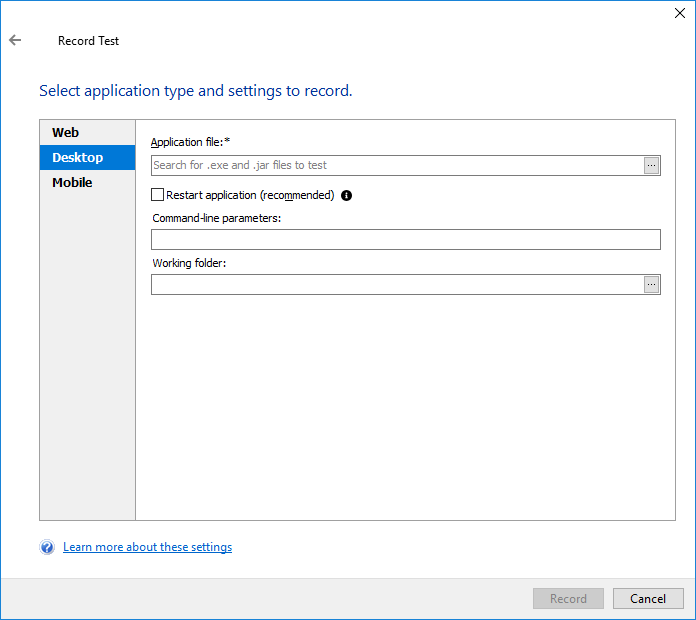
Desktop
Select Desktop to test regular Windows applications that run on your computer.
Requirement: the Desktop module.
-
In the Application file text box, specify the application to be tested:
-
You can type the application name or its path manually. TestComplete will search for the application in the list of installed applications and display matches in the drop-down list,
– or – -
You can click the ellipsis button (
 ) and browse for the executable in the subsequent dialog.
-
-
We recommend that you select the Restart application check box.
In order for the recorded test to run successfully, the state of your tested application at the beginning of the test run must be the same as it was at the beginning of test recording.
-
If the specified application is a generic Windows application, if needed, in the Command-line parameters text box, enter command-line arguments that will be used to launch your application.
-
If the specified application is a Java application:
-
Specify the Java Virtual Machine (JVM) launcher that will be used to run the application.
-
If your .jar file does not have a startup class defined in the manifest, select the Specify application’s entry point check box and enter the name of the application class to be invoked.
You can also click Configure class paths and specify the list of locations where the launcher will search for classes.
-
If needed, specify command-line arguments to pass to the Java Virtual Machine in the Environment Options text box.
-
If needed, in the Command-line arguments text box, enter command-line parameters to pass to your application.
-
-
If needed, in the Working folder text box, specify a working folder for the application run. You can either type the desired folder name, or click the ellipsis button and browse for the desired folder in the resulting Browse for Folder dialog.
-
To start recording, click Record. TestComplete will minimize its window and launch your tested application. You can then simulate user actions on it, and TestComplete will record them as test commands. See Recording Automated Tests for more information.
The application you specified will be added to the list of tested applications of your project. This will help you start your tested applications and configure their start parameters (like the command line) easier. For example, TestComplete can start tested applications automatically every time you start test recording.
Related topics of interest
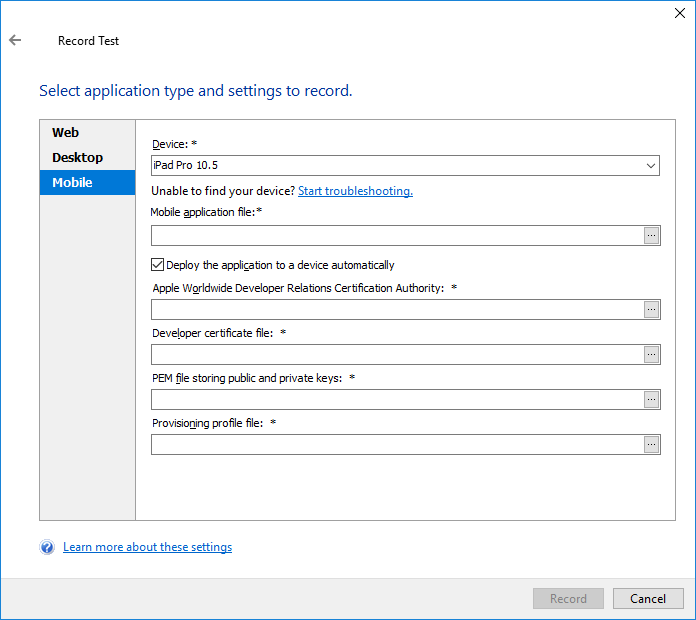
Mobile
Select Mobile to record a test for an Android or iOS application (whether it is “native”, or Xamarin.Forms).
Requirements:
-
The Mobile module
-
A supported Android or iOS mobile device or a virtual machine.
-
In the Device drop-down list, specify the mobile device where you will record your test. If the device is not on the list, make sure it is prepared for testing and is configured properly. For more information on preparing devices for testing, see —
You can also click Start troubleshooting to resolve issues preventing TestComplete from connecting to the device.
-
In the Mobile application file text box, specify your tested Android application package (.apk) or iOS archive file (.ipa).
You can type the path to the file manually, or you can click the ellipsis button (
) and browse for the file in the subsequent dialog. -
We recommend that you keep the Deploy the application to a device automatically check box selected. This way, TestComplete will install the application to your mobile device whenever you start that application when recording or playing back a test.
-
The application you select for testing must be instrumented, that is, it must be prepared for testing so that TestComplete can access the application’s internal objects, methods, and properties. If your tested application is not prepared for testing, TestComplete will try to instrument it automatically.
Configure the way the instrumented application must be signed. Depending on the selected type of the tested mobile application, the following signing options are available:
-
To start recording a test, click Record. TestComplete will instrument your mobile app (if needed), deploy it to the selected mobile device and launch the application there. It will then display the Mobile Screen where you can simulate user actions on the application.
 iOS application
Related topics of interest
- Recording Automated Tests
- Preparing mobile applications for testing:
- Testing Mobile Applications