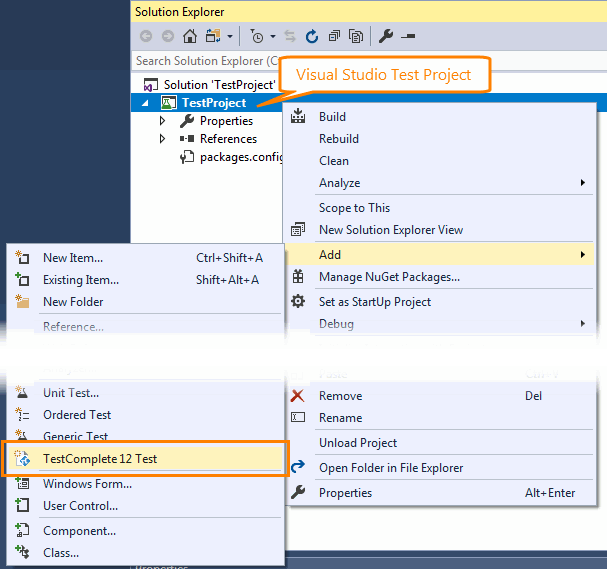
TestComplete integration with Visual Studio is implemented with TestComplete 14 Visual Studio Integration Package. The package adds a new test item type to Visual Studio test projects, TestComplete 14 Test:
You use it to add TestComplete projects and project suites to your Visual Studio test projects and run TestComplete tests from Visual Studio.
The package’s installation file is shipped with TestComplete. You can find the installation program in the <TestComplete 14>\VS Integration folder.
To enable TestComplete integration with Visual Studio, and then with Azure DevOps Services (formerly known as VSTS) or Team Foundation Server, install the package.
Requirements
Depending on the tasks you are going to perform, the computer where you will install the integration must have the following software installed:
The computer where you will add TestComplete tests to Visual Studio test projects and run them from Visual Studio locally
-
One of the following Visual Studio versions:
-
Microsoft Visual Studio 2015–2017 (Community, Enterprise or Professional edition).
-
Microsoft Visual Studio 2013 (Community, Ultimate, Premium, or Professional edition).
-
Microsoft Visual Studio 2010–2012 (Ultimate, Premium, or Professional edition).
-
-
TestComplete 14 (or TestExecute 14).
Computers where you will run TestComplete tests as part of your pipeline:
| Use self-hosted (private) agents to run TestComplete tests. Running TestComplete tests on Microsoft-hosted agents is not supported. |
-
TestComplete 14 (or TestExecute 14).
-
Team Foundation Server with the Team Foundation Build Service component.
– or –
Team Foundation Build Service.
– or –
Build and Release Agent for Windows.
– or –
Test Agent for Visual Studio.
 The build service or test agent must be running as an interactive process so that TestComplete could interact with the desktop and tested application’s UI.
 -
One of Visual Studio versions supported by TestComplete (optional, if you use Team Foundation Build 2010 or 2012).
 |
If you have several editions of Visual Studio 2017 installed on that computer, we recommend that you install TestComplete integration with all those editions. |
Installation
-
Install TestComplete (or TestExecute) on the needed computer. See Installing TestComplete.
-
In the TestComplete (or TestExecute) folder, find the package installation program:
<TestComplete 14>\VS Integration\VSIntegration.exe
-
Run the installation program and wait until all needed files are extracted. The installation wizard will guide you through the process.
-
In the installation wizard, select the integration features that are appropriate for Visual Studio and Team Foundation tools installed on your computer.
By default, the installation program installs the integration for all Visual Studio versions and tools installed on your computer.
Installing Integration in Silent Mode
You can install the integration package in silent mode (without user interaction) by using specific command-line arguments.
Running Silent Installation
-
Install TestComplete (or TestExecute) on the target computer.
-
In the TestComplete (or TestExecute) folder, locate the package installation program:
<TestComplete 14>\VS Integration\VSIntegration.exe
-
Run the installation using the /z"-silentmode" command-line argument. For example:
<path_to_installation_package>\VSIntegration.exe /z"-silentmode" -
The installation program will install the integration package without user interaction.
Supported Command-Line Arguments
You run integration installation in silent mode by launching its installation package with the following command-line arguments:
/z"-silentmode …"
This argument must be specified. It commands the installation program to run in silent mode.
-remove
The integration package is removed from the computer.
Verifying the Silent Installation Success
If an error occurs during the installation, the installation wizard displays an error message. It indicates that something went wrong. The absence of an error message indicates the installation has been completed successfully.
To determine whether the installation has completed successfully, you can also check the exit code of the installation. 0 indicates a successful installation. Other values indicate an error. For a complete list of error codes, see the following web page:
 helpnet.flexerasoftware.com/installshield19helplib/helplibrary/SetupLog.htm
See Also
Integration With Azure DevOps Services and Team Foundation Server

