
 Do not switch to the TestComplete help during the recording. The recording engine traces and records all user actions, so the recorded test will contain commands that simulate “switching”.
To see the instructions, you can print them before starting the record. Or, if you have two monitors, you can move the TestComplete help system window to the other monitor.
-
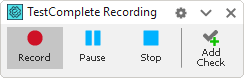
TestComplete will start test recording, switch to the recording mode and show the Recording toolbar on screen:
-
TestComplete will show the Mobile Screen window with the screen of the connected device. TestComplete records only those actions over mobile applications that you perform in this window and ignores the actions that you perform on the device, emulator or virtual machine.
-
TestComplete will automatically deploy the Orders application to the mobile device and start this application. If the application does not start, you can launch it manually by selecting it from the Run App menu of the Recording toolbar.
TestComplete records the application start using a special application launch test command. You will see this command later, when we will analyze the recorded test.
- Wait until the iOS Orders application installs and starts on the mobile device. The Mobile Screen window will display the initial window of the application:
: iOS Orders Application")
Click the image to enlarge it.
-
In the Mobile Screen window, click the Edit button:
: Switching the Orders application to the edit mode")
Click the image to enlarge it.
This will switch the Orders application to the edit mode.
-
Click the second order in the list made by Samuel Clemens. This will display the Edit Order panel:
: The Edit Order Panel")
Click the image to enlarge it.
-
Change the customer name in the order details.
In the CUSTOMER INFO section, clear the Samuel Clemens text, type Mark Twain, and press Enter. Use your desktop keyboard to input text in the Mobile Screen window.
-
Click the Save button in the Edit Order panel and confirm the changes.
-
If you are recording the test on an iPhone device (whose display shows only one panel at a time), you need to touch the Orders button in the navigation bar. This will take you back to the Orders List panel.
iPad devices display both panels simultaneously, so, there is no need to perform such an action.
-
Click Done to switch off the edit mode:
: Modified Orders List")
Click the image to enlarge it.
The orders list will return to normal mode.
-
Insert a comparison command into our test. It will verify that the application customer list displays the modified name - Mark Twain.
We call comparison commands checkpoints. TestComplete offers various types of checkpoints that can be used to verify different types of data (see Checkpoints). One of the most frequently used checkpoints is the Property checkpoint. You use it to check data of application controls. We will use this checkpoint in our tutorial.
-
Click
 Add Check on the Recording toolbar:
This will invoke the Checkpoint wizard. It will guide you through the process of checkpoint creation.
-
On the first page of the wizard, click Object property.
-
Click the target glyph (
 ) with the left mouse button and keep the button pressed.
Wait until the wizard minimizes, and then drag the icon to the orders list of the Orders application. While you are dragging, TestComplete will highlight the controls and windows under the mouse cursor with a red frame.
Release the mouse button when the target glyph is over the orders list, and when the entire list is highlighted with the red frame:
: Selecting Orders List")
Click the image to enlarge it.
-
After you release the mouse button, TestComplete will restore the wizard and display the name of the selected object in the Object box and the image of the object below it:
Click Next to continue.
-
The next page of the wizard contains a list of properties suggested for checking:
This list includes the properties provided by TestComplete and the properties defined by the tested application. To view all the available properties, you can click More Properties.
-
Clear the Selected check box of the property selected by default.
To verify the data, we will use the
wItemproperty of the TableView object. It provides access to the text shown in the specified item of the selected table view.Find the
wItemproperty in the table and click its PAR button. Enter 1 in the Index column and 0 in the Section column. The wizard will retrieve the data to check. Select the Selected check box of thewItemproperty:
-
Click Finish to complete the checkpoint creation. TestComplete will append the checkpoint command to the recorded test.
-
-
Click
 Stop on the Recording toolbar to stop recording. TestComplete will process the recorded test commands and save them to the keyword test.
 Prev
Prev
See Also
About Tested Application
Recording Tests
About Property Checkpoints