
When you use Excel files as data storages, you may need to change existing data or add new rows to these files. The recommended approach depends on your test type:
In Keyword Tests
Note: To work with Excel files in your tests, you do not need to have Microsoft Office Excel installed on your computer.
You can use the following operations, to write data to Excel files:
-
Excel - Write Value – Writes data to the specified Excel cell.
-
Excel - Add Row – Adds a row with specified data below the last non-empty line of the Excel sheet.
Excel - Write Value operation
Follow the steps below to write data to the specified Excel cell:
-
Add the Excel - Write Value operation to your keyword test. TestComplete will display the Operation Parameters wizard.
-
On the first page of the wizard, specify Excel parameters.
-
In the File Name edit box, click the ellipsis button. In the Value edit box of the subsequent dialog, specify the fully qualified file name of your Excel file.
Click OK.
-
In the Cell edit box, select a cell to which data will be written. If the file is loaded correctly, the Cell edit box displays the content of the file. You can select the desired sheet and cell or specify it manually (for instance, Sheet1!B3).
Note: If the manually specified sheet does not exist, TestComplete creates it and writes data to the corresponding cell. -
In the Value edit box, type the desired value manually or click the ellipsis button and use the subsequent Operation Parameters dialog.
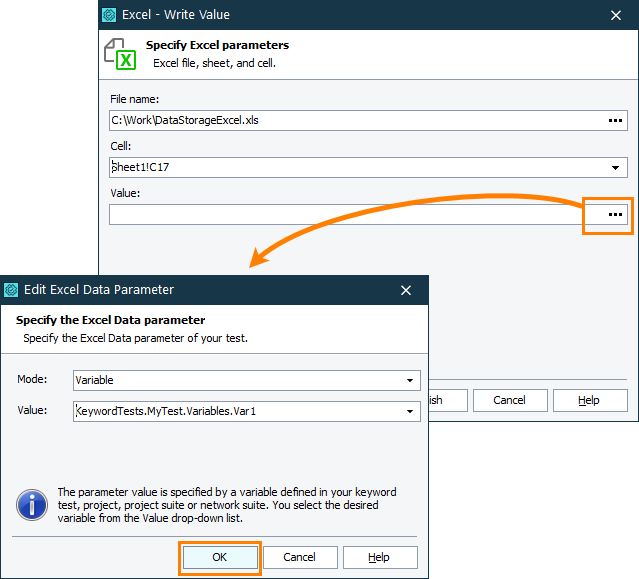
Click Next.
-
-
On the next page of the wizard, review the parameters you have created and change them if needed.
Click Finish. TestComplete will add the operation to your test.

Excel - Add Row operation
Follow the steps below to write data to add a row with specified data below the last non-empty line of the Excel sheet:
-
Add the Excel - Add Row operation to your keyword test. TestComplete will display the Operation Parameters wizard.
-
On the first page of the wizard, specify Excel parameters.
-
In the File Name edit box, click the ellipsis button. In the Value edit box of the subsequent dialog, specify the fully qualified file name of your Excel file.
Click OK.
-
In the Sheet edit box, select a sheet to which a row will be added. If the file is loaded correctly, the Sheet edit box displays the existing sheets. You can select the desired sheet or specify it manually.
Note: If the manually specified sheet does not exist, TestComplete creates it and adds the row to the corresponding sheet. -
Click Add to specify columns to which new values will be added. In the Value rows, type the desired values manually or click the ellipsis button and use the subsequent Operation Parameters dialog.
If needed, click Remove to remove the last added column with the corresponding value.
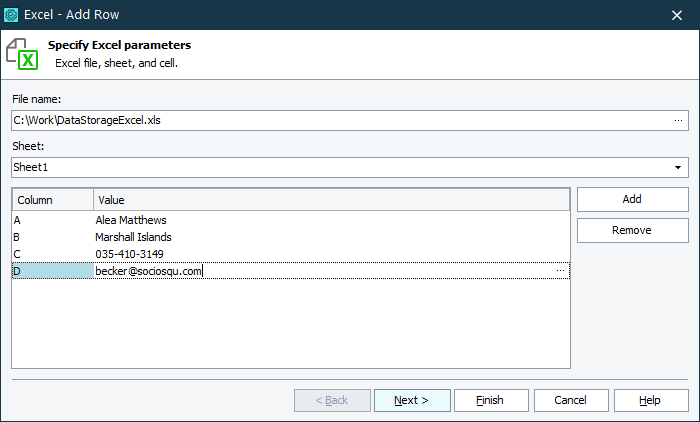
Click Next.
-
-
On the next page of the wizard, review the parameters you have created and change them if needed.
Click Finish. TestComplete will add the operation to your test.

-
The target Excel file must not be opened in third-party programs during operation executions.
-
Excel files secured with passwords are not supported.
-
Operations save changes to Excel files during their executions, you do not need to add additional operations for these purposes.
In Script Tests
Note: To work with Excel files in your tests, you do not need to have Microsoft Office Excel installed on your computer.
To write data to Excel cells, use the Excel runtime object:
JavaScript, JScript
function ExcelExample()
{
// Get the sheet of the Excel file
var excelFile = Excel.Open("C:\\temp\\DataStorageExcel.xlsx");
var excelSheet = excelFile.SheetByTitle("Sheet1");
// Read data from the Excel file
var valueA = excelSheet.Cell("A", 3).Value;
var valueB = excelSheet.Cell(2, 3).Value;
var valueC = excelSheet.CellByName("C3").Value;
// Write the obtained data into a new row of the file
var rowIndex = excelSheet.RowCount + 1;
excelSheet.Cell("A", rowIndex).Value = valueA;
excelSheet.Cell(2, rowIndex).Value = valueB;
excelSheet.Cell("C", rowIndex).Value = valueC;
// Save the file to apply the changes
excelFile.Save();
// Save the file with another name
// excelFile.SaveAs("C:\\temp\\DataStorageExcel_new.xlsx");
}
Python
def ExcelExample():

  # Get the sheet of the Excel file
  excelFile = Excel.Open("C:\\temp\\DataStorageExcel.xlsx")
  excelSheet = excelFile.SheetByTitle["Sheet1"]

  # Read data from the Excel file
  valueA = excelSheet.Cell["A", 3].Value
  valueB = excelSheet.Cell[2, 3].Value
  valueC = excelSheet.CellByName["C3"].Value

  # Write the obtained data into a new row of the file
  rowIndex = excelSheet.RowCount + 1
  excelSheet.Cell["A", rowIndex].Value = valueA
  excelSheet.Cell[2, rowIndex].Value = valueB
  excelSheet.Cell("C", rowIndex).Value = valueC

  # Save the file to apply the changes
  excelFile.Save()

  # Save the file with another name
  # excelFile.SaveAs("C:\\temp\\DataStorageExcel_new.xlsx")
VBScript
Sub ExcelExample
Dim excelFile, excelSheet, valueA, valueB, valueC, rowIndex
' Get the sheet of the Excel file
Set excelFile = Excel.Open("C:\temp\DataStorageExcel.xlsx")
Set excelSheet = excelFile.SheetByTitle("Sheet1")
' Read data from the Excel file
valueA = excelSheet.Cell("A", 3).Value
valueB = excelSheet.Cell(2, 3).Value
valueС = excelSheet.CellByName("C3").Value
' Write the obtained data into a new row of the file
rowIndex = excelSheet.RowCount + 1
excelSheet.Cell("A", rowIndex).Value = valueA
excelSheet.Cell(2, rowIndex).Value = valueB
excelSheet.Cell("C", rowIndex).Value = valueC
' Save the file to apply the changes
excelFile.Save()
' Save the file with another name
' excelFile.SaveAs("C:\temp\DataStorageExcel_new.xlsx")
End Sub
DelphiScript
procedure ExcelExample;
var
excelFile, excelSheet, valueA, valueB, valueC, rowIndex;
begin
// Get the sheet of the Excel file
excelFile := Excel.Open('C:\\temp\\DataStorageExcel.xlsx');
excelSheet := excelFile.SheetByTitle('Sheet1');
// Read data from the Excel file
valueA := excelSheet.Cell('A', 3).Value;
valueB := excelSheet.Cell(2, 3).Value;
valueC := excelSheet.CellByName('C3').Value;
// Write the obtained data into a new row of the file
rowIndex := excelSheet.RowCount + 1;
excelSheet.Cell('A', rowIndex).Value := valueA;
excelSheet.Cell(2, rowIndex).Value := valueB;
excelSheet.Cell('C', rowIndex).Value := valueC;
// Save the file to apply the changes
excelFile.Save();
// Save the file with another name
// excelFile.SaveAs('C:\\temp\\DataStorageExcel_new.xlsx');
end;
C++Script, C#Script
function ExcelExample()
{
// Get the sheet of the Excel file
var excelFile = Excel["Open"]("C:\\temp\\DataStorageExcel.xlsx");
var excelSheet = excelFile["SheetByTitle"]("Sheet1");
// Read data from the Excel file
var valueA = excelSheet["Cell"]("A", 3)["Value"];
var valueB = excelSheet["Cell"](2, 3)["Value"];
var valueC = excelSheet["CellByName"]("C3")["Value"];
// Write the obtained data into a new row of the file
var rowIndex = excelSheet["RowCount + 1"];
excelSheet["Cell"]("A", rowIndex)["Value"] = valueA;
excelSheet["Cell"](2, rowIndex)["Value"] = valueB;
excelSheet["Cell"]("C", rowIndex)["Value"] = valueC;
// Save the file to apply the changes
excelFile["Save"]();
// Save the file with another name
// excelFile["SaveAs"]("C:\\temp\\DataStorageExcel.xlsx");
}
In some advanced cases, for instance, when you work with ranges of cells in Excel files, you can use the Excel.Application COM object.
| Note: | Microsoft Office Excel must be installed on your computer. |
For more information, see Working With Excel Files via COM.
See Also
Working with Microsoft Excel Files
Reading Data in Excel Files
Validating Data in Excel Files