
The instructions below describe how to set up an Appium instance on a macOS machine and to configure it to manage Android devices.
1. Install Homebrew, Carthage, and Node.js
-
Install Homebrew (it’s a package management system that makes it easier to install software on Mac OS machines).
Please find Homebrew and follow the instructions on this website:
-
Install Carthage (a dependency manager). To do this, open the Terminal window and run the following command:
brew install carthage -
Install Node.js and NPM. To do this, run this command:
brew install node
2. Install Java
-
Download the JDK from this website:
 https://www.oracle.com/java/technologies/javase-downloads.html
Run the dowloaded installer and follow the instructions you will see on screen.
-
Run the following command in the Terminal:
/usr/libexec/java_home --vThis will output a string like
/Library/Java/JavaVirtualMachines/jdk1.8.0_171.jdk/Contents/Home. This is the location of the JDK on your computer. Copy this value. -
Open your .bash_profile file in an editor and add the following two lines to it:
export JAVA_HOME="copied-path-to-JDK-directory"
export PATH=$JAVA_HOME/bin:$PATHSave the changes.
Restart the Terminal to grab the new .bash_profile settings.
3. Install Appium
You can do this in one of the following ways:
-
Install Appium Desktop. You can download the installer from this website:
https://github.com/appium/appium-desktop/releasesPlease note that this method of installing Appium is neither recommended nor supported.
— or —
-
Install Appium with npm. Run the following command in the Terminal window:
npm install -g appium
Tip: We also recommend that you install the Appium Doctor in addition to Appium. It will help you fix issues with Appium and Android settings easier. To install the Doctor, run the following command in the Terminal:
npm install -g appium-doctor
4. Install AndroidStudio
Download the installation package from the following website:
https://developer.android.com/studio/
Run the installer and follow the instructions you will see on the screen.
 When installing, make sure to select the Android Virtual Device component.
5. Configure AndroidStudio and Android SDKs
-
Start AndroidStudio.
-
In the Welcome dialog box, select Configure > SDK Manager. This will open the SDK Manager dialog box:
-
On the SDK Platforms tab, select the SDKs that you will need for testing.
Select at least one SDK. -
Switch to the SDK Tools tab and make sure the following tools are selected there:
- Android SDK Build-tools
Note: Select the latest available version. - Android SDK Platform-Tools
- Intel x86 Emulator Accelerator (HAXM installer)
- Android SDK Build-tools
-
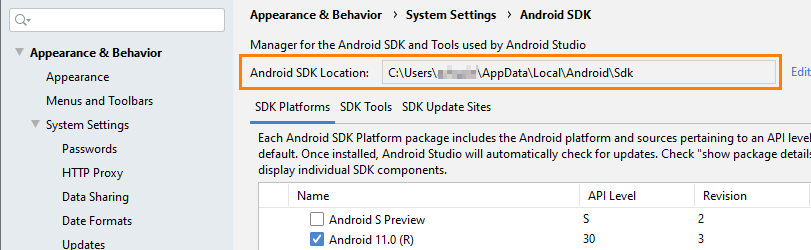
Copy the value of the Android SDK Location box at the top of the SDK Manager dialog. We will need this value later:
-
-
Now you need to specify the path to Android SDKs in the
ANDROID_HOMEenvironment variable. To do this, open the bash_profile in an editor and add the following lines to it:export ANDROID_HOME="copied-Android-SDK-location"
export PATH=$PATH:$ANDROID_HOME/tools:$ANDROID_HOME/platform-tools -
Restart the Terminal to get changes made to your .bash_profile. Run the following command to ensure it does not cause an error:
adb
(Optional) You can also run Appium Doctor to see if anything else requires configuring before you start testing:
appium-doctor
6. Install Gradle
Run the following command in the Terminal:
brew install gradle
After the installation is over, check the gradle version by running this command:
gradle -v
7. Install Maven
-
Run the following command in the Terminal:
brew install maven
Check the maven version by running this command:
mvn -version
-
Open your .bash_profile file in an editor and add the following line to it:
export PATH="/usr/local/Cellar/maven/version-number/bin:$PATH"
To get the version-number, go to /usr/local/Cellar/maven/. Look at the names of subdirectories there. These are available versions. Select the version you need.
After Appium is set up and configured, you can connect to it from your TestComplete computer to create and run tests. See Connecting to Mobile Devices and Opening Testing Sessions.
See Also
Connecting to Mobile Devices and Opening Testing Sessions
Set up Appium Server
Testing iOS Applications - Tutorial