
This tutorial explains how to add WS-Security (WSS) to your tests in ReadyAPI by using keystores and truststores. ReadyAPI manages WS-Security configurations at the project level, so these configurations can be used in different places of your project:
-
For outgoing requests and their responses.
-
For incoming requests to virtual APIs and for the responses sent by these APIs.
-
For monitored requests and responses in the SOAP Monitor.
Basic Configuration
-
Switch to the APIs node and select Auth & Security > WSS Config on the toolbar.

Click the image to enlarge it.
-
In the subsequent dialog, switch to the Keystore tab, click
 , and select the keystore file.
Click the image to enlarge it.
-
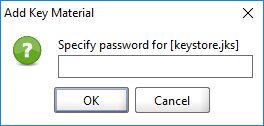
Enter the keystore password.
-
Make sure the Status is
OK. If it is not, make sure you have specified the correct keystore and password.
Click the image to enlarge it.
-
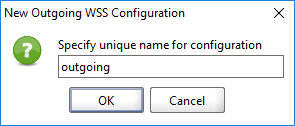
Switch to the Outgoing WS-Security Configurations tab and click
.
Click the image to enlarge it.
-
Enter the name of the outgoing configuration and click OK.
-
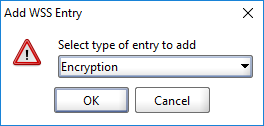
Create a new WSS entry in the editor below.

Click the image to enlarge it.
-
Select Encryption from the drop-down menu and click OK.
-
Select the keystore and key alias to use and enter the password for that alias and click OK.

Click the image to enlarge it.
-
Open the SOAP request you want to apply the encryption to and expand the Auth panel.
-
Click Add Authorization Profile and add a Basic authorization.

Click the image to enlarge it.
-
In the Outgoing WSS drop-down list, select the WS-Security you have added.

Click the image to enlarge it.
-
Finally, execute the SOAP request and click the Raw tab to verify that the encryption is added to the outgoing request.

Click the image to enlarge it.
Alternative: Adding an Outgoing Configuration Explicitly
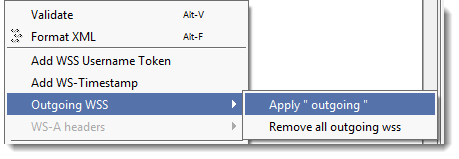
As an alternative to using the Auth tab, you can right-click in the XML editor and select Outgoing WSS in the drop-down list. This will generate an outgoing WSS and add it to the current XML message.
When you receive a message with an associated WSS configuration, the results are shown in the WSS inspector. The inspector shows a list of processing results and the occurred errors:

Click the image to enlarge it.