
To add the test data ReadyAPI collects to a printable report, you need to include the subreport in the main report.
-
Select Project > Reporting from the main menu.
-
Switch to the Subreports tab.
-
To add a new custom subreport, click
 .
. -
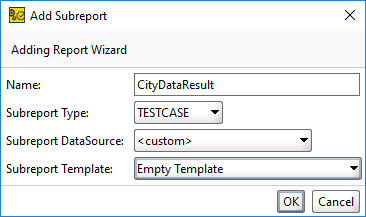
In the Add Subreport dialog:
-
Enter the subreport name – CityDataResult.
-
Select the TESTCASE subreport type.
-
Select the <custom> subreport data source.
-
Select the Empty Template subreport template.
-
Click OK.
-
-
Replace the content of the new subreport with the following:
JRXML
<jasperReport xsi:schemaLocation="http://jasperreports.sourceforge.net/jasperreports http://jasperreports.sourceforge.net/xsd/jasperreport.xsd" name="ReportTemplate" language="groovy" pageWidth="595" pageHeight="842" columnWidth="555" leftMargin="20" rightMargin="20" topMargin="30" bottomMargin="30" xmlns="http://jasperreports.sourceforge.net/jasperreports" xmlns:xsi="http://www.w3.org/2001/XMLSchema-instance">
<property name="ireport.encoding" value="UTF-8"/>
<template>"../../styles.jrtx"</template>
<!--FIELDS & PARAMS-->
<field name="CityName" class="java.lang.String"/>
<field name="FormattedAddress" class="java.lang.String"/>
<field name="Type" class="java.lang.String"/>
<field name="PlaceID" class="java.lang.String"/>
<field name="Status" class="java.lang.String"/>
<columnHeader>
<band height="59">
<staticText>
<reportElement style="ColumnHeader" x="0" y="35" width="122" height="20"/>
<textElement textAlignment="Left" verticalAlignment="Middle"/>
<text>CityName</text>
</staticText>
<staticText>
<reportElement style="ColumnHeader" x="133" y="35" width="40" height="20"/>
<textElement textAlignment="Left" verticalAlignment="Middle"/>
<text>FormattedAddress</text>
</staticText>
<staticText>
<reportElement style="ColumnHeader" x="183" y="35" width="74" height="20"/>
<textElement textAlignment="Left" verticalAlignment="Middle"/>
<text>Type</text>
</staticText>
<staticText>
<reportElement style="ColumnHeader" x="265" y="35" width="200" height="20"/>
<textElement textAlignment="Left" verticalAlignment="Middle"/>
<text>PlaceID</text>
</staticText>
<staticText>
<reportElement style="ColumnHeader" x="465" y="35" width="70" height="20"/>
<textElement textAlignment="Left" verticalAlignment="Middle"/>
<text>Status</text>
</staticText>
<staticText>
<reportElement style="SmallHeader" x="0" y="0" width="535" height="34"/>
<textElement textAlignment="Left" verticalAlignment="Middle"/>
<text>City data result</text>
</staticText>
</band>
</columnHeader>
<detail>
<band height="21">
<textField>
<reportElement x="0" y="1" width="122" height="20"/>
<textElement textAlignment="Left" verticalAlignment="Top"/>
<textFieldExpression class="java.lang.String">$F{CityName}</textFieldExpression>
</textField>
<textField>
<reportElement x="133" y="1" width="50" height="20"/>
<textElement textAlignment="Left" verticalAlignment="Top"/>
<textFieldExpression class="java.lang.String">$F{FormattedAddress}</textFieldExpression>
</textField>
<textField isBlankWhenNull="true">
<reportElement x="183" y="1" width="74" height="20"/>
<textElement textAlignment="Left" verticalAlignment="Top"/>
<textFieldExpression class="java.lang.String">$F{Type}</textFieldExpression>
</textField>
<textField isStretchWithOverflow="true">
<reportElement x="265" y="1" width="200" height="20"/>
<textElement textAlignment="Left" verticalAlignment="Top"/>
<textFieldExpression class="java.lang.String">$F{PlaceID}</textFieldExpression>
</textField>
<textField isStretchWithOverflow="true">
<reportElement x="465" y="1" width="70" height="20"/>
<textElement textAlignment="Left" verticalAlignment="Top"/>
<textFieldExpression class="java.lang.String">$F{Status}</textFieldExpression>
</textField>
</band>
</detail>
</jasperReport>This creates a tabular layout. The names of its fields and the names of data sink step properties are identical.
-
Switch to the Available Reports tab.
-
Click
 to copy the existing Test Case Report report.
Click the image to enlarge it.
-
Click
 to change the name of the copy.
 -
Click the new copy.
-
In the editor under the table, remove or comment out the following lines:
JRXML
<dataSourceExpression>$P{TestCaseRequirements}</dataSourceExpression>
<subreportExpression class="java.lang.String">"subreport:RequirementsReport"</subreportExpression>
Click the image to enlarge it.
-
Add the following code after the commented lines:
JRXML
<dataSourceExpression>$P{DataSink}</dataSourceExpression>
<subreportExpression class="java.lang.String">"subreport:CityDataResult"</subreportExpression>Here you add the CityDataResult subreport to the report template and fill it with the data sink data.

dataSourceExpressionshould match the name of the data sink test step. -
Now you can create a test case report. Switch to the test case page.
-
Click
 .
. -
The Create Report dialog will appear.
In the Type list, select the template you have modified.

-
Click OK to finish the creation.
The result should look as follows:

Click the image to enlarge it.