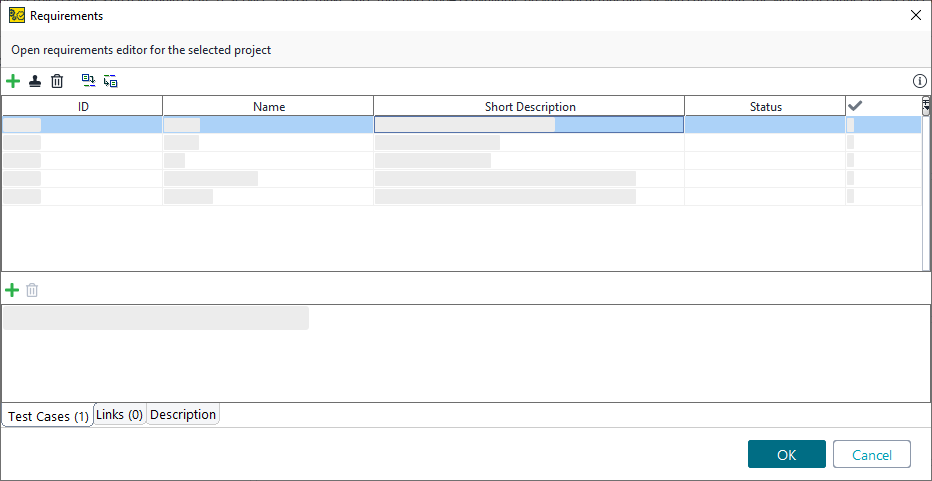
ReadyAPI includes management of basic requirements to allow you to add product requirements to your projects and test cases.
Manage requirements
You can work with requirements generally on the project level and more specifically on the test case level.
-
On project level: To open the Requirements dialog, right-click your project in the Navigator, and select Requirements.
You can also select a project by clicking it, and open the Requirements dialog by selecting Project > Requirements on the ReadyAPI toolbar.
-
On test case level: Double-click the test case in the Navigator, and switch to the Requirements page.
Both the Requirements dialog and page consist of two main parts:
-
The list of requirements.
-
The tabs containing connected test cases, links and description for each requirement.
The list of requirements is a table and has the following columns:
| Column | Description |
|---|---|
| ID |
The requirement identifier. |
| Name |
The requirement name or title. |
| Short Description |
The requirement description. |
| Status |
The scoping status. Can be |
| Test Cases |
The number of connected test cases. |
Use the toolbar to work with the list of requirements:
-
 – Adds a requirement.
 -
 – Clones a requirement.
 -
 – Removes a requirement.
 -
 – Links a requirement to a test case.
 -
 – Imports requirements. To learn more about that option, see Importing and Exporting Requirements.
This button is available only on the project level. -
 – Exports requirements. To learn more about that option, see Importing and Exporting Requirements.
This button is available only on the project level.
 All requirements you add to the list will appear as results in test case reports.
The bottom editor allows you to do the following:
-
On the Test Cases tab, you can see the list of connected test cases and their test status, if the test has been run at least once already.
Use the toolbar to add or remove test cases from the list.
-
On the Links tab, you can see the list of links to external sites or systems. These links can provide you with a connection to the build tools or task management systems.
Use the toolbar to add, remove or edit links from the list.
-
On the Description tab, you can create a detailed description for the requirement. For example, you can add the information about particular tests, environments or results.
Import and export requirements
On the project level, you can import and export requirements in the CSV format.
The CSV file you plan to use for importing should include one row for each requirement. It can have the following columns:
| Column | Description |
|---|---|
| ID |
The requirement identifier. Mandatory for import. |
| Name |
The requirement name or title. Mandatory for import. |
| Short Description |
The requirement description. Mandatory for import. |
| Status |
The scoping status. Mandatory for import. |
| Test Cases |
The list of test case names, with ### as a separator. |
| Links |
The list of associated links, with ### as a separator. |
| Description |
Longer text describing the requirement. You can use |

