LoadNinja validations check whether your tested web application works as expected.
Validations are an essential part of load testing. The errors that heavy load might cause don’t necessarily mean a server crash or broken connections. A server can start responding slower than your clients expect, or it can return only part of the requested web pages, or it can skip some requests (like additional requests for images, style sheets, or script files mentioned on the web page), and so on. Validations help you evaluate server responses and detect malfunctions.
Add validations
Add validations when recording UI tests or editing existing tests.
-
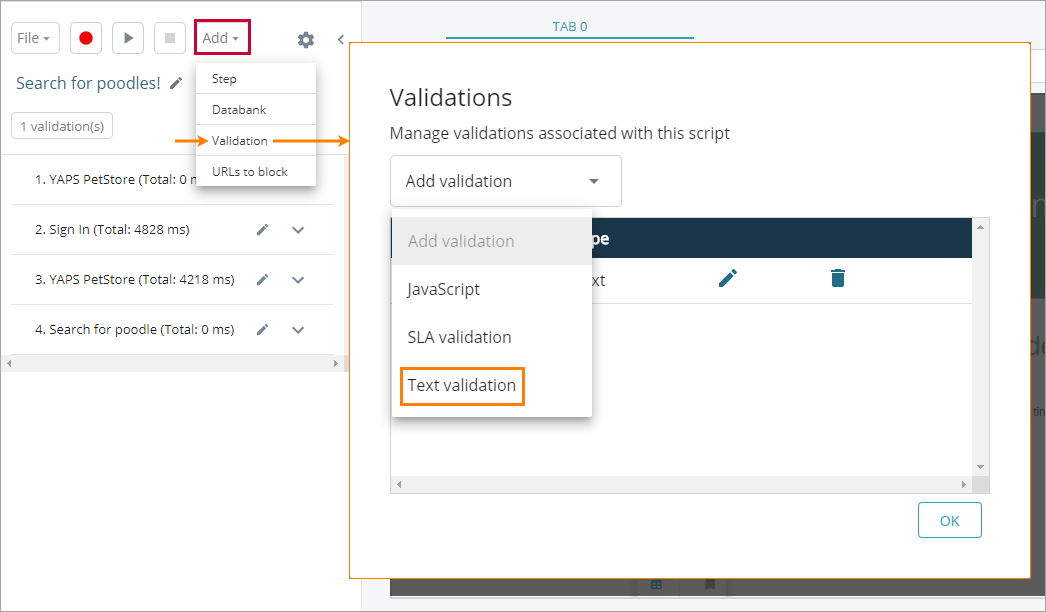
When you reach a point where a validation is needed, select Add > Validation on the toolbar.
-
In the Add validation drop-down list, select the validation type: text, JavaScript, or SLA.
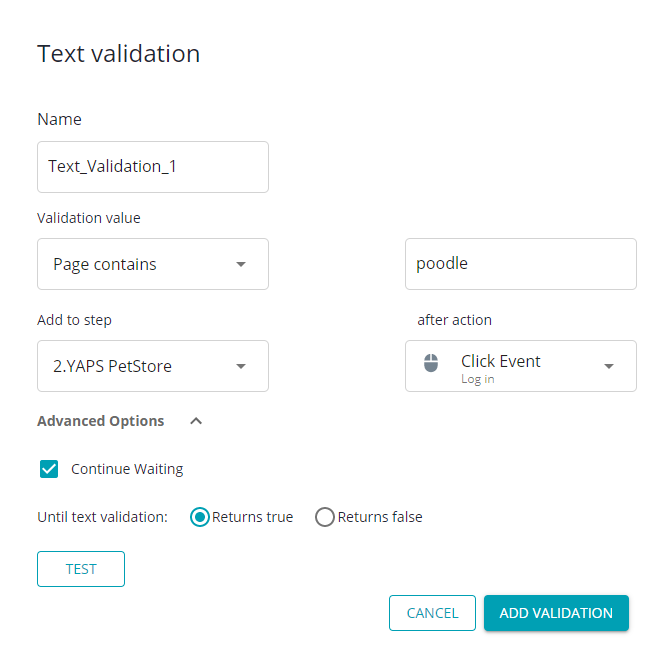
Depending on the selected validation type, configure the other parameters. Make sure to specify the validation name that LoadNinja will display in the test step list.
-
Click Test to check whether the validation is configured correctly.
-
Click Add validation.
What happens if a validation fails?
If a validation fails, LoadNinja stops running the test (that is, it stops simulating the virtual user) and logs an error.
If the scenario’s On Error setting is set to Enter debug mode, the debug mode will be available for the failed virtual user. Use it to check the cause of the failure. See Debugging.
Text validations
A text validation checks if a web page contains the specified text.
-
The search is case-sensitive.
-
If the web page contains frames, LoadNinja searches only within the main page, not in frames.
-
Regular expressions and wildcards are not supported.
-
If your test has a databank attached, you can use databank values in the validation. To do this, click Insert Data in the Text edit box and select the needed value from the subsequent menu. See Data-Driven Validations in UI Tests.
LoadNinja searches for text in the page’s HTML markup, so, if the text is formatted (for example, it is bold or italics), you may need to include the relevant HTML tags in the sought-for text.
Example
Consider a page with this HTML code:
| HTML code | How it appears on the page |
|---|---|
|
<div> |
HeadingThe quick brown fox jumps over the lazy dog. A > B |
The following validations will pass:
- fox jumps over
- quick <b>brown</b> fox
- Heading
- <h5>Heading</h5>
- A > B
but the following validations will fail:
-
quick brown fox
Why: missing <b> tags around "brown"
-
A > B
Why: special characters must appear exactly as they are in the HTML code; in this case, ">" must be encoded as ">".
Parameters
Text validations have the following parameters:
| Name | Description |
|---|---|
|
Name |
The unique name of the validation. LoadNinja uses it when displaying the validation in the test step list. |
|
Validation value |
One of the following values:
Note: Specify the value to search for in the box on the right. |
|
[Text] |
The text that the test engine will expect (or will not expect) to find on the page. |
|
Add to step |
Specifies the step to add the validation to. |
|
after action |
Specifies the target action (event). LoadNinja will apply the validation after the selected action. Note: If the step you have specified in Add to step does not contain any events (for example, if it is a synthetic step), this drop-down list will not appear at all. The following actions are supported:
|
In case of failure |
Specifies how the test engine will handle the case when the validation condition fails. The following options are possible:
|
Script validations
Script validations use JavaScript to perform complex checks, such as:
-
Check the presence or absence of specific elements on the page.
-
Check an element’s attributes, such as
classorcolor. -
Verify the contents of multiple elements at the same time.
-
And more — you can check anything that is in the page’s Document Object Model (DOM).
Script validations look as follows. The code must be inside a function, and this function must return true if the validation passes or false if it fails. The assertion name you specified in LoadNinja becomes the function name.
JavaScript
function myValidation() {
// Do something
return true; // Return true or false to indicate the PASS/FAIL status
}
return myValidation();
| Tip: | Click the Test button in the Add Validation dialog to make sure the JavaScript syntax is correct. Syntax errors will fail the validation. |
Example
Verify that the login button is enabled:
JavaScript
function isLoginButtonEnabled() {
var button = document.querySelector("button.login-item");
return (! button.disabled);
}
return isLoginButtonEnabled();
LoadNinja provides full access to the tested page’s DOM via the document object, so you can access web page elements in the same way regular JavaScript does on web pages:
JavaScript
// Get an element by its ID
var obj = document.getElementById("elem-id");
// Get the page title
var title = document.title;
// Get the inner HTML code of the last element
var data = document.body.lastChild.innerHTML;
Parameters
JavaScript validations have the following parameters:
| Name | Description |
|---|---|
|
Name |
The unique name of the validation. LoadNinja uses it when displaying the validation in the test step list. |
|
Add to step |
Specifies the step to add the validation to. |
|
after action |
Specifies the target action (event). LoadNinja will apply the validation after the selected action. Note: If the step you have specified in Add to step does not contain any events (for example, if it is a synthetic step), this drop-down list will not appear at all. The following actions are supported:
|
In case of failure |
Specifies the test engine behavior when the validation fails. The following options are possible:
|
Databank values in script validations
If your test has a databank attached, you can use databank values in JavaScript validations. To do this, click Insert Data and select the needed databank column, or type the columns alias ({{column-alias}}) in the script code. The test engine inserts the value as it is specified in the databank. If needed, enclose it into quotes or add other syntax elements. See also Data-Driven Validations in UI Tests.
SLA validations
SLA validations verify that the service responds within the expected time frame. LoadNinja applies only one SLA validation to each test step.
Parameters
SLA validations have the following parameters:
| Name | Description |
|---|---|
| Name | The unique name of the validation. LoadNinja uses it when displaying the validation in the test step list. |
| SLA threshold | The maximum waiting time for a page. |
| Applies to |
Specifies the step to add the validation to. Note: You can select any of the recorded steps, or all of them at once. LoadNinja will add the validation to the step, but it will not show it in the editor. To check if the validation is present, reopen the Validations dialog. |
To edit an existing validation
-
Click # validation(s) on the toolbar to open the Validations dialog.
-
In the dialog, find the validation you want to edit and click next to it.
-
Configure the validation parameters as needed.
-
Click Update validation.
-
Click Cancel to close the Validations dialog.
To delete a validation
-
Click # validation(s) on the toolbar to open the Validations dialog.
-
In the dialog, find the validation you want to delete and click next to it. Confirm the action in the subsequent dialog.
See Also
UI Tests (or Scripts)
UI Test Recorder
Data-Driven Validations in UI Tests


