
You use the Export to Web Page dialog to specify what test results should be exported to a web page and specify the path to this page.
To Call the Dialog
Click Export to HTML on the Report panel toolbar and then click Export to Web Page.
Specifying Data to Export
-
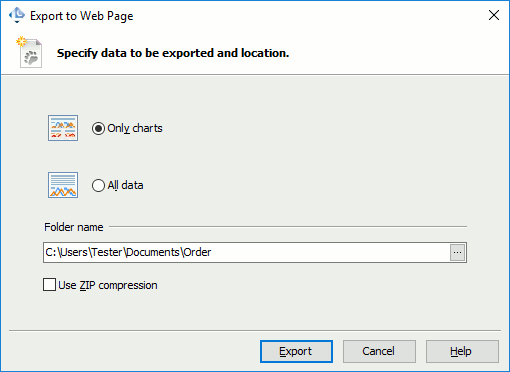
Specify what results should be exported:
-
To export the entire report, click All data option.
-
To export only the charts the Report panel contains, click Only charts.
Note: LoadComplete will still export the table shown on the Summary » Load Profile Graph page.
-
-
In the Folder name field, specify the path to the folder that will store the exported results. By default, the resulting .html file is saved to the <User Data>\Documents\Test1 folder.
Note: LoadComplete automatically creates the report subfolder in the specified folder. The report folder includes the exported results. If you save one more report to the same folder, LoadComplete will create the report(1) subfolder and store the second report to it. -
Select the Use zip compression check box to pack all the exported files to the export.zip archive. This frees you from extra actions when you need to pack the results or send them via email after they are exported.
Once you specify the settings, click Export. LoadComplete will export test results to the specified folder. If you have a web browser that can show web pages, LoadComplete automatically opens the resulting file in it. Otherwise, LoadComplete opens the folder where the file resides in the Explorer panel.
Click Cancel to close the dialog without exporting the test results.