Automation with HipTest Publisher – continuous integration
Once the tests have been successfully generated from a CucumberStudio project, it is possible to integrate them in a continuous integration process. We will not discuss here the details on how to integrate (as it will change, based on your CI tool) but describe the necessary steps to integrate CucumberStudio in your CI tool.
In this documentation, we will consider the following pre-requisites:
- You have structured the project for automation and you have been able to generate tests with HipTest Publisher.
- You want to have the results of the CucumberStudio tests execution back to CucumberStudio.
- You already have a CI server and task for your project.
Create a test run dedicated to the CI
First, create a test run dedicated to the CI. This test run should only contain the tests that have been fully automated.
This test run should not be used for manual testing, only for the results sent by the CI tool. If you need to complete your validation process with some manual testing, use other test runs to set the results.
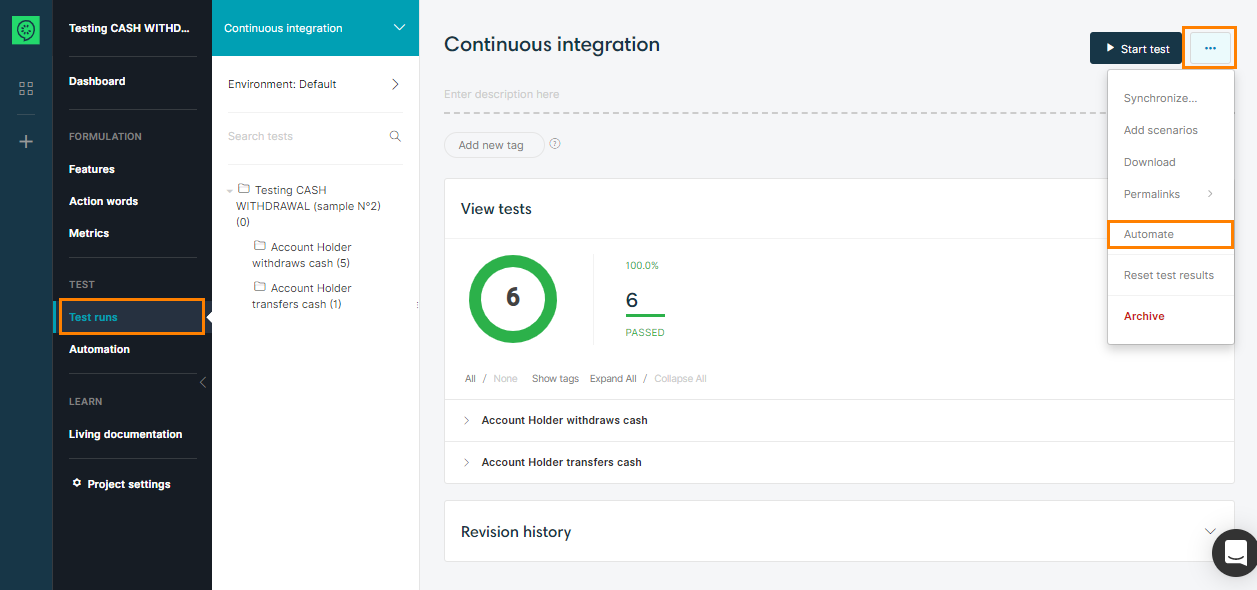
Once the test run is created, click on the CucumberStudio step menu, then on the Automate action:
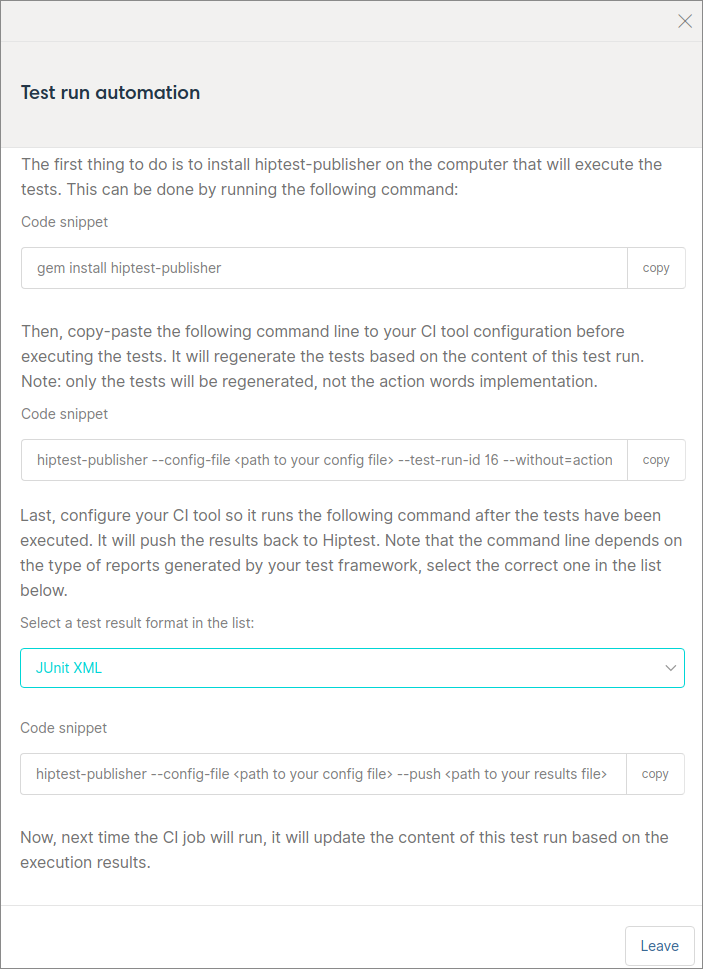
You should now see the following modal:
| Note: | Each command line displayed in the modal can be copied to the clipboard. |
There are three command lines displayed in the modal. Let’s detail them a bit further.
Installing HipTest Publisher on the CI
In order to be able to synchronize both the test run and the code, and to push the results back to CucumberStudio, you need to have hiptest-publisher installed on the machine that will run the tests.
This machine also need to have Ruby installed (as you did previously on the developer machine). Then, you can run the command:
It will install or update the tool. Note that this is a good practice to have this command line ran before executing the tests every time, in order to ensure that the latest version of HipTest Publisher is installed.
Updating the tests from the test run
The second command line should look something like that:
As the previous command, it must be executed before running the tests, so copy the command in the pre-build part of your CI job configuration.
Its role is to ensure that you are executing the correct version of the tests (the one that is fixed in the test run). It will also add some annotations to the tests, so CucumberStudio will be able to match the results and the tests.
One important thing to note here is the argument --without=actionwords. It ensures that only the tests will be regenerated, not the implementation you did for the action words.
| Tip: | Adding --verbose is a good practice as it will output more information while generating tests. It can be useful for debugging. |
Pushing the results back to CucumberStudio
The third command line should look like this:
Its role is to push the results back to CucumberStudio, so it should be executed after the tests.
One good practice is to copy it in the post-build part of your CI job, not directly after the command running the tests, otherwise it might not be ran if some test fails (that depends on your CI tool configuration).
The command varies according to the type of report generated by your test framework, so ensure you have selected the correct format before copying the command line.
Once every command has been added to the CI job, run it once manually to ensure everything is working, and you should see the results appear in the test run you created previously.
FAQ
-
I used CucumberJS that generates a JUnit format but it doesn’t push the test results to CucumberStudio. Why?
When CucumberJS exports JUnit reports, it does not place the test UIDs.
Here’s a quick workaround for this kind of issue:
-
In packages.json, use this command line to select the
cucumberjs-junitpackage:"cucumberjs-junit": "git://github.com/vincent-psarga/cucumber-junit.git" -
When running the tests, use this command line:
node_modules/.bin/cucumber-js --format=json | node_modules/cucumber-junit/bin/cucumber-junit --features-as-suites > junit_output.xml
Now, you can push the junit_output.xml file to CucumberStudio and it should work fine ����
-
-
I have executed my tests on multiple environments, how can I push the results for these environments back to a test run?
You can specify an environment name in the hiptest-publisher command using the
--execution-environmentoption:hiptest-publisher --config-file <path to your config file> --push <path to your results file> --test-run-id <id of the test run> --push-format <format of the execution report> --execution-environment <name of the environment>If the environment with the given name does not exist, a new environment will be created.


