
SpecFlow is a Behavior Driven Development test framework for C# that is used with Visual Studio. The appeal of SpecFlow, and BDD in general, is that your tests define how your application should behave in different scenarios. In similar fashion to other BDD frameworks (like Behat for PHP), the appeal here is that SpecFlow tests are written in plain English, they can be understood by devs, managers, marketers, and everyone else involved with your application.
SpecFlow does work with a wide variety of test runners, but for the sake of this document, as well as the example files in the GitHub repository, we will be working with SpecFlow running NUnit in Visual Studio 2017.
Get set up
Visual Studio IDE Extensions
The first thing we will need to do for SpecFlow to run within Visual Studio is to make sure it has the proper extensions so it can run tests. This really only consists of 2 additions, assuming a full install of Visual Studio. These are SpecFlow for Visual Studio 20XX and the extension for your test runner, which for this example we will be using NUnit 3 Test Adapter. This is demonstrated in the picture below.
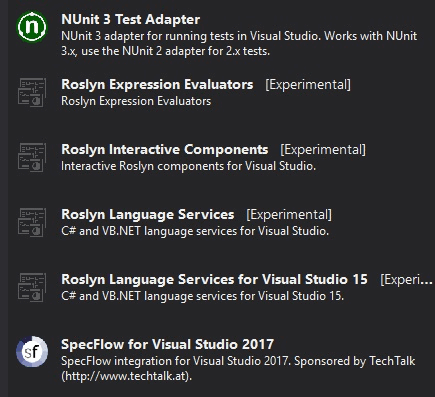
Visual Studio IDE Extensions
Set up the project
It is highly recommended to use the Unit Test Project (xUnit Test Project for VS2017) template for SpecFlow tests. This takes care of various dependencies that your packages need. If these are missing then that hampers the functionality of SpecFlow. Once that is all setup we can then move on to getting our packages using the NuGet Package manager. You can access this by right clicking on your project in the Solution Explorer. Once there, you may need to update several packages, as well as needing to install the packages in the image below.
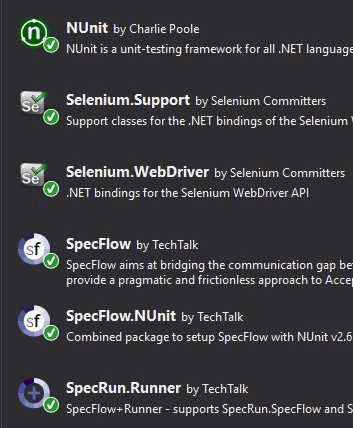
SpecFlow Packages
Write tests
Files needed for test
SpecFlow tests typically consist of two files, your Feature file and your Step Definitions. Your feature file is where you will be coding out your scenarios, and your step definitions file is where you define how your test behaves. You can view an example of both of these files in the SpecFlow GitHub Repository with the files CBTFeature.feature and CBTFeatureSteps.cs respectively.
Scenario: Search for SpecFlow on Google
Given I navigate to the page "https://www.google.com"
And I see the page is loaded
When I enter Search Keyword in the Search Text box
And I click on Search Button
Then Search items shows the items related to SpecFlow
SpecFlow allows you to generate a step definition file based off of your scenarios in the feature file if you right click in the editor. For a resource that can help you out with writing scenarios, we would recommend checking out Automation Panda’s guide to Writing Good Gherkin.
Set up the RemoteWebDriver
To get Selenium to work with our service, you wisll need to use their RemoteWebDriver class that gets passed specific capabilities that we require on our side. Below is a code displaying an example of this, pulled from CBTFeatureSteps.cs in the GitHub repo.
C#
using System.IO;
using System.Net;
using System.Text;
using TechTalk.SpecFlow;
using NUnit.Framework;
using OpenQA.Selenium;
using OpenQA.Selenium.Remote;
using System.Text.RegularExpressions;
using System.Collections.Generic;
using System.Collections.Specialized;
namespace CBT_Example_2
{
[Binding]
publicclass CBTFeatureSteps
{
protected RemoteWebDriver driver;
// Your username and authkey here
publicstring username = "your username";
publicstring authkey = "your authkey";
DesiredCapabilities caps = new DesiredCapabilities();
[Given(@"I navigate to the page ""(.*)""")]
publicvoid GivenINavigateToThePage(string p0)
{
caps.SetCapability("name", "SpecFlow-CBT");
caps.SetCapability("record_video", "true");
caps.SetCapability("build", "1.35");
caps.SetCapability("browserName", "Firefox");
caps.SetCapability("version", "53x64");
caps.SetCapability("platform", "Windows 10");
caps.SetCapability("screenResolution", "1366x768");
caps.SetCapability("record_video", "true");
caps.SetCapability("record_network", "false");
caps.SetCapability("username", username);
caps.SetCapability("password", authkey);
// Start the remote webdriver
driver = new RemoteWebDriver(new Uri("http://hub.crossbrowsertesting.com:80/wd/hub"), caps, TimeSpan.FromSeconds(180));
// Navigate to site
driver.Manage().Window.Maximize();
driver.Navigate().GoToUrl(p0);
}
[Given(@"I see the page is loaded")]
publicvoid GivenISeeThePageIsLoaded()
{
Assert.AreEqual("Google", driver.Title);
}
[When(@"I enter Search Keyword in the Search Text box")]
publicvoid WhenIEnterSearchKeywordInTheSearchTextBox()
{
string searchText = "Specflow";
driver.FindElement(By.Name("q")).SendKeys(searchText);
}
[When(@"I click on Search Button")]
publicvoid WhenIClickOnSearchButton()
{
driver.FindElement(By.Name("btnG")).Click();
driver.Manage().Timeouts().ImplicitlyWait(TimeSpan.FromSeconds(5));
}
[Then(@"Search items shows the items related to SpecFlow")]
publicvoid ThenSearchItemsShowsTheItemsRelatedToSpecFlow()
{
Assert.AreEqual("SpecFlow - Binding Business Requirements to .NET Code", driver.FindElement(By.XPath("//h3/a")).Text);
driver.Quit();
}
}
}
The key things to note here is that you will need to instantiate your RemoteWebDriver and Capabilities variables in the class itself and not in one of the step functions. You will then actually pass your desired capabilities to the driver, and open it up within the step functions.
As for the capabilities that need to be passed into the RemoteWebDriver, your username is the email address associated with your CrossBrowserTesting account, and the authkey needs to be set to the authkey associated with your account (you can find this via the account page, or at the top of the automation page in the Test Center part of our website).
To find the os_api_name and browser_api_name that correspond to your targeted platform, you can either go to CrossBrowserTesting’s Selenium Page, open the wizard, and watch the capabilities in the sample script change as you select different browsers, OR you can parse the os/browser you want out of the JSON response from https://crossbrowsertesting.com/api/v3/selenium/browsers
The other capabilities are personal settings such as the Name of your test, what version of your test is it, do you wish to record video of your test, etc.
After that is just coding selenium tests as usual to execute the behavior you are specifying in your scenarios. Ensure that when entering a URL into the GoToURL function of the RemoteWebDriver that you include the “http://” part as well, otherwise there may be issues. Also be sure to use the Quit() function, due to Close() not being sufficient enough to end the test.
Close Notes
This can be a very flexible framework, like for example in the example Feature file, you can see in the “Given” step, I have placed a URL to test in quotations, and this gets passed through in the Step Definitions file as a variable, so really if someone wanted to test multiple sites in the same way, you could use this Step Definition file and have that apply to anything that uses the same “Given I navigate to the page “” ” syntax in its scenario. Opens the possibility of anyone being able to make their own test if your step definitions are solid enough!
For examples and source code to this tutorial, check out our SpecFlow GitHub Repository
Should anything in this document not be clear enough or if you need further assistance with this, you can contact Support
See Also
Test Frameworks and Tools
About Selenium Testing
Selenium and C#
NUnit