
This topic describes how to setup Collaborator integration with TFS work item system. To learn general principles of how any issue-tracking integration operates, see Issue-Tracking Integrations: Overview.
-
Open the Collaborator login page in a browser and log in to Collaborator as an administrator.
-
In Collaborator, go to ADMIN > Remote System Integrations > Issue-Tracking Services
-
In the New Remote System Configuration section, select TFS and click Create. This will display the configuration settings.
-
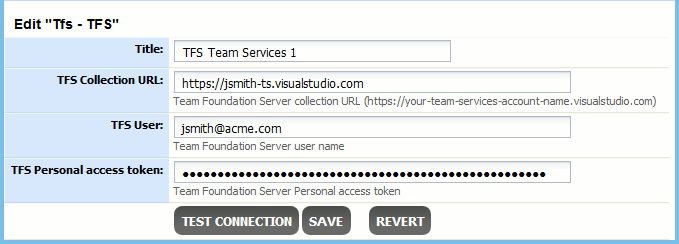
Specify the setting values:
Remote system configuration settings depend on whether you use a self-hosted version or a SaaS version of Team Foundation Server known as Visual Studio Team Services. If you use the latter, then you might need to set-up alternate authentication credentials at first and then use those credentials in your TFS configuration. See Client Configuration for Visual Studio Team Services for configuration instructions.
Setting
Description
Title
The configuration name as it will be displayed in Collaborator user interface.
TFS Collection URL
For self-hosted version of Team Foundation Server, specify the URL of Team Foundation Project Collection to work with.
For instance: http://tfs.acme.com/my-collection
For SaaS version of Team Foundation Server, specify the URL of your Visual Studio Team Services account (without project or collection names).
For instance: http://jsmith-ts.visualstudio.com
TFS User
The name of Team Foundation user. For SaaS version of Team Foundation Server, specify either user name or alternate primary user name.
The specified user must have read-write permissions to TFS projects. Administrator permissions are NOT required. You may specify a regular user, or create a dedicated user for this integration.
TFS Personal access token
The personal access token of Team Foundation user. For SaaS version of Team Foundation Server, specify either personal access token or alternate credentials password.
After specifying these values, you can click Test Connection to verify if you entered data correctly.
-
After you specified the values, click Save. This will create and enable TFS integration.
-
Switch to the ADMIN > Remote System Integrations page. The Integration Status section allows you to quickly enable or disable integrations with remote systems.
-
Locate the Enable TFS Integration setting and verify that it is set to Yes.
Establish trusted connection
When your on-premises server use SSL connection, its certificates may not be trusted by Collaborator server. In this case you will need to import that certificate as trusted.
To establish trust, you need to create a keystore and import the public key of your on-premises server as a trusted certificate in it:
-
Get the certificate file from your on-premises server or network administrator.
-
Use Java’s
keytoolutility to generate the keystore file and to import the certificate in it. You can findkeytoolin the $JAVA_HOME/bin directory:$JAVA_HOME/bin/keytool -import -alias github -keystore <Collaborator Server>/tomcat/conf/collab.ks -trustcacerts -file <certificate-file-name>
For more information on command-line arguments of the keytool utility, see keytool documentation.
-
 Most likely you will be prompted to confirm the validity of the certificate. It is imperative for the security of the overall system that you verify the key matches the trusted material. Before accepting the certificate, you should contact the administrator that sent you the certificates and verify that the certificate fingerprints that you see match the certificate fingerprints that they intended to send you.
 -
The final step is to configure Collaborator to use the newly created keystore. Open the <Collaborator Server>/ccollab-server.vmoptions file in a text editor, and add the following lines to it:
-Djavax.net.ssl.trustStore=<Collaborator Server>/tomcat/conf/collab.ks
-Djavax.net.ssl.trustStorePassword=<the password>
-
Restart the Collaborator server.
Now the integration between Collaborator and TFS work items is configured and running.