
About
Checklists are user-defined “to-do” lists that you can apply to reviews. You can use them to remind review participants to perform certain actions before the review can be completed:

Click the image to enlarge it.
To specify which checklist should be used for this or that review, modify the review template. You can use different checklists for different review templates.
Collaborator logs all user activities on the checklist. When a review participant select a check box in the list, Collaborator logs the participant’s user name and the timestamp of the change. Also, it adds a message to the Chat section of the review. If a review participant clears some check box in the list, Collaborator also adds a message about this to the Chat section.
For auditing purposes, you can include checklist status changes into the Review Details Report. Make sure that Checklist History is set to Display Checklist History for this.
Requirements
-
Checklists are available in Collaborator Team and Collaborator Enterprise.
For a complete list of differences between Collaborator editions, see Collaborator Editions. -
To create and edit checklists, you need administrator permissions in Collaborator.
Create Checklist
-
Log in to Collaborator as administrator.
-
On the main toolbar, click ADMIN and then go to the Review Templates > Checklists settings.
-
Click New Checklist:

Click the image to enlarge it.
-
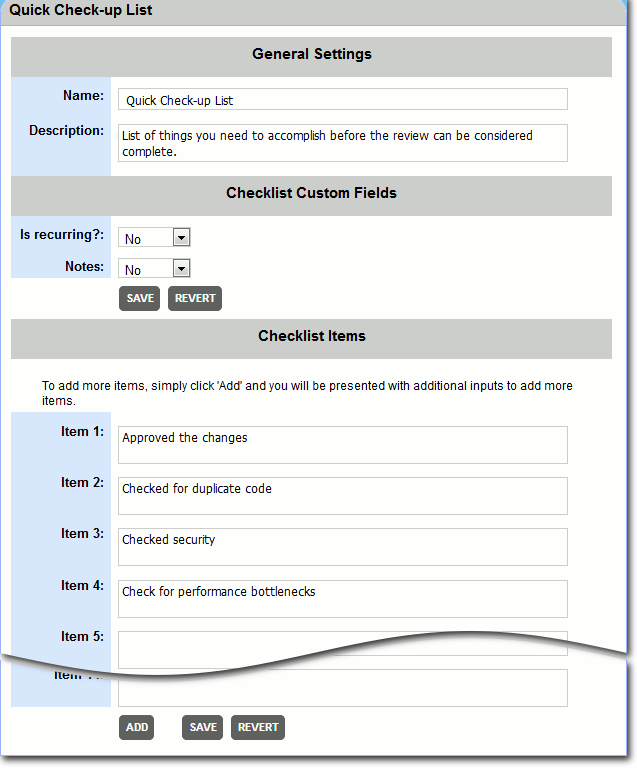
On the subsequent screen, specify the checklist name and arbitrary description. They will visible in the Collaborator settings.
 Checklist names must be unique.
 -
If you have created any checklist custom fields, specify which of them should be displayed for this checklist.
-
Enter the list items in the Item nn edit boxes.
Checklist items must be unique within a checklist.By default, Collaborator has edit boxes for 10 items. If you need more, simply click Add:
 If you don’s need some item, simply clear its edit box. Collaborator will not display empty items on the review screen.
 -
Click Save to apply the changes.
-
After you have created the checklist, apply the checklist to a template:
-
Go to ADMIN > Review Templates. Find the desired template on the Enabled Review Templates tab and click Edit:

Click the image to enlarge it.
-
In the template settings screen, choose the checklist you want to use in the template, and then select the checklist type: mandatory or non-mandatory. Mandatory checklists must have all items checked before the review can be approved:
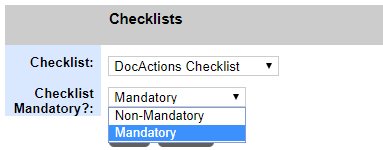
Note: Only one checklist can be applied to a template.
-
Click Save to apply the changes, or click Revert to cancel them.
-
Edit Checklist
-
Log in to Collaborator as administrator.
-
On the main toolbar, click ADMIN and then go to the Review Templates > Checklists settings.
-
Find the needed checklist in the list and click Edit:

Click the image to enlarge it.
-
On the subsequent screen, change the checklist name or description, and modify the text of list items.
To delete an item, clear its edit box. Collaborator will not display empty edit boxes on the review screen.
-
Click Save to apply the changes, or click Revert to cancel them.
| Note: | If you change a checklist after it has been applied to some review, Collaborator will not update existing reviews that use this checklist. It will apply the checklist to new reviews created later. To use a checklist for existing reviews, re-apply the template to them. |
Disable and Enable Checklists
You cannot delete checklists in Collaborator. To make some checklist unavailable, you can disable it. Disabled checklists are not displayed in reviews.
To disable a checklist:
-
Log in to Collaborator as administrator.
-
Go to ADMIN > Review Templates > Checklists.
-
Find the needed checklist in the list and click Disable:

Click the image to enlarge it.
| Note: | If you disable a checklist after it has been applied to some reviews, Collaborator will not update these existing reviews. The changes will be applied to future reviews. To use a checklist for existing reviews, re-apply the template to them. |
After you disabled a checklist, Collaborator will change the link text to “Enable”. To enable a checklist, simply click this Enable link:

Click the image to enlarge it.