
-
Open the Collaborator login page in a browser and log in to Collaborator as an administrator.
-
In Collaborator, go to Admin > Remote System Integration
-
Switch to the Configure Remote Systems tab.
-
In the New Remote System Configuration section, select JIRA Legacy and click Create. This will display the configuration settings.

Do not confuse JIRA and JIRA Legacy configurations. JIRA Legacy configuration is for legacy integrations that were created with earlier versions of Collaborator. 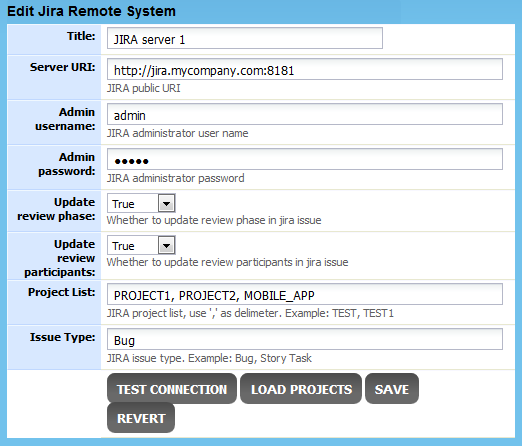
-
-
Specify the setting value.
Setting
Description
Title
The configuration name as it will be displayed in Collaborator user interface.
Server URI
The JIRA server's URL and port.
Admin username, and
Admin passwordThe user name and password that Collaborator will use for connecting to JIRA.
It is recommended that the specified user has administrator permissions in JIRA.
After specifying these values, you can click Test Connection to verify if you entered data correctly.
Setting
Description
Update review phase
Specifies if the Collaborator plugin will automatically update the review status in JIRA items that are connected with that review.
Update review participants
Specifies if the Collaborator plugin will automatically update the list of review participants in JIRA items that are connected with that review.
Project List
A string containing the keys of JIRA projects, to which Collaborator will add new items.
This setting's value is used as a default value for the JIRA Project custom field (see below).
If you are going to create items in several projects, enter several keys and separate them with commas.
Tip: Click Load Projects to read project keys from the JIRA instance specified by the Server URI setting. Project keys are case-insensitive. The Project List field can contain up to 255 characters.
Issue Type
The type of the JIRA items to be created from Collaborator. You can specify one item type only.
This setting is case-sensitive. Specify the type exactly as it is written in JIRA settings. -
After you specified the values, click Save. This will create a JIRA configuration.
-
Scroll the Admin > Remote System Integration screen up to the Integration Status section. This section allows you to quickly enable or disable integrations with remote systems.
-
Locate the Enable JIRA Legacy Integration setting and change it to Yes.
-
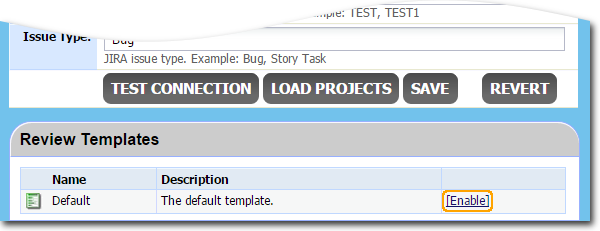
Once the JIRA configuration is enabled, Collaborator automatically creates a new review custom field named JIRA Project and displays the Review Templates panel. In this panel you need to specify which of the templates should display the JIRA Project field.
JIRA Project is a drop-down field which lists JIRA projects, to which Collaborator can add new items. Just after the creation, the JIRA Project field is hidden. To show this field in the desired template, just click the Enable link next to template name.
Now the integration between Collaborator and JIRA is configured and running. The last thing we need to do is to link Collaborator user accounts with JIRA user accounts.