This topic describes how to establish single sign-on between an SSO server and Collaborator using Security Assertion Markup Language (SAML) protocol. To learn general principles of how single sign-on operates, see Single Sign-On.
In SAML terms, SSO server will act as Identity Provider (IdP) and Collaborator will act as Service Provider.
Below we describe how to establish single sign-on between Collaborator and OneLogin SSO server. Integration with Single Sign-On servers of other vendors is performed in a similar manner.
Enable HTTPS Connections
Most Single Sign-On servers use HTTPS connections, so you will likely need to enable it for Collaborator server as well. For instructions, please see Configure HTTPS. Do not forget to restart the Collaborator server to apply changes.
Install and Configure SSO Server
-
Install your preferred SSO server. In this instruction we will use OneLogin SSO server.
-
Log in to your SSO server as account owner or super user.
-
Add new application integration:
-
Select Apps > Add Apps from the main menu.
-
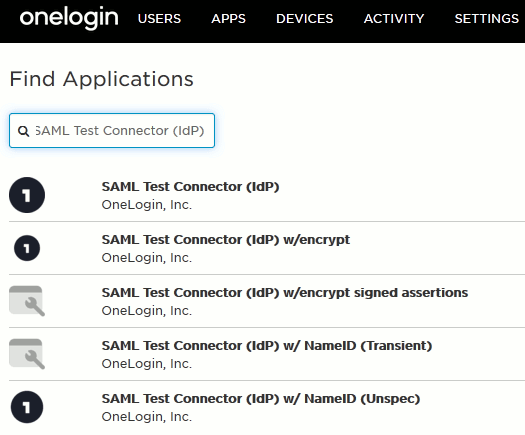
Search for an application of the SAML Test Connector (IdP) type.

-
Specify the application display name and, optionally, its icons, then click Save.
-
Switch to the Configuration tab and specify the following data:
-
Switch to the Parameters tab and append two assertion parameters with names: FirstName and LastName. For both parameters, enable the Include in SAML assertion option. These parameters will contain the users first and last name, respectively. Optionally, modify the NameID parameter to pass username rather than email address as primary user identifier. Also you can use the NameID parameter or add one more parameter to store LDAP user name for synchronizing group membership via LDAP or Active Directory. See Synching User Group Membership with LDAP/Active Directory below.
-
Click Save to confirm application configuration changes.
-
-
Assign users to the created Collaborator SAML Connector application.
-
Select Users > All Users from the main menu.
-
Click the needed user.
-
Switch to the Applications tab.
-
Click the plus sign to assign an app to the user.
Make sure you have matchin user accounts in Collaborator server and in OneLogin – that is, the OneLogin username must be identical to the Collaborator user. Also, create at least one OneLogin user account that will match the account of Collaborator administrator; logging in with this account via SSO will log you into Collaborator server as its administrator.
-
-
Select Apps > Company Apps from the main meny, click Collaborator SAML connector application, then switch to the SSO tab.
This tab holds SAML metadata that you must provide to your Collaborator server to complete the integration.
Configure Collaborator Server
-
Open the Collaborator login page in a browser and log in to Collaborator as an administrator.
-
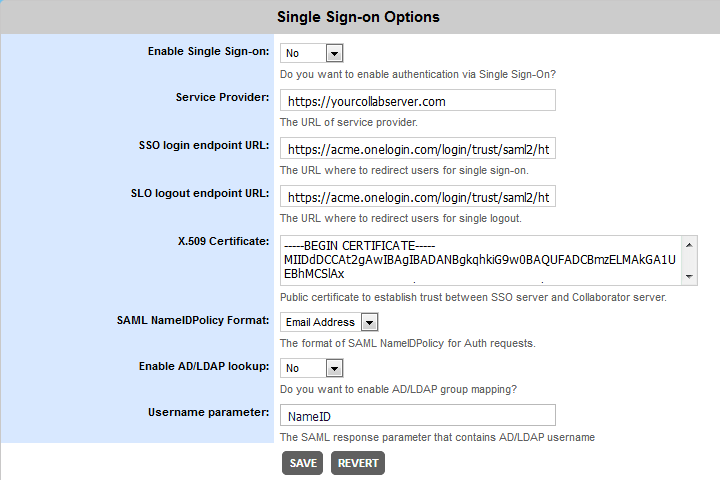
In Collaborator, go to Admin > System settings, switch to the SSO tab, and specify the following settings:
Enable Single Sign-On Enables SAML single sign-on authorization on this Collaborator server. Service Provider The URL of the entity that is expected to receive the SAML message. In our case, this will be the URL of your Collaborator server.
For instance: https://yourcollabserver.com.
Your Collaborator server must be accessible to SSO server. Configure a firewall or enable tunneled connections to do so. SSO login endpoint URL The URL where to redirect users for single sign-on procedure, if a session is not already established.
This should be the value from the SAML 2.0 Endpoint (HTTP) setting of Collaborator SAML Connector application on OneLogin server.SSO logout endpoint URL The URL where to redirect users for single logout procedure.
This should be the value from the SLO Endpoint (HTTP) setting of Collaborator SAML Connector application on OneLogin server.X.509 Certificate The public certificate that establishes trust between SSO server and Collaborator server.
This should be the value from the X.509 Certificate setting of Collaborator SAML Connector application on OneLogin server.
To copy the X.509 certificate, click View Details and click the Copy to Clipboard icon.Enable AD/LDAP lookup Specifies whether Collaborator should retrieve user membership in groups from the LDAP/Active Directory. See Synching User Group Membership with LDAP/Active Directory. Username parameter Defines the name of SAML response parameter that contains LDAP username. See Synching User Group Membership with LDAP/Active Directory.
If the parameter name is not specified, or the parameter returns empty value the synchronization is not performed.
-
After you specified the values, click Save.
Now the integration between Collaborator and single sign-on server is configured and running. Further attempts to log into Collaborator server will be processed by the sign-on server.
Synching User Group Membership with LDAP/Active Directory
While using single sign-on server to manage users, you may additionally configure user and group synchronization between Collaborator and the LDAP directory or Active Directory. In this case, Collaborator will perform the following actions:
- When user logs in, sign-on server server sends SAML response with some pre-configured parameters.
- Collaborator receives the response, extracts the parameter which holds LDAP username, and sends this username to LDAP directory or Active Directory.
- LDAP directory or Active Directory searches for groups this user belongs to and returns them to Collaborator
- Collaborator checks if the specified user and group(s) exist, creates them if needed, and adds the user to the group(s).
- Collaborator server logs the user in.
Configuration for LDAP/AD Synchronization
In order to enable synchronization of group membership via LDAP or Active Directory, you need to perform the following actions:
- Select/Create an SAML assertion parameter in user info section that will to store user's username. This could be any existing parameter, like NameID, FirstName or LastName, or some dedicated parameter.
- Modify Collaborator server's Root.xml (<Collaborator Server>/tomcat/conf/Catalina/localhost/ROOT.xml) to use the Combined Realm element:
<Realm className="org.apache.catalina.realm.CombinedRealm" >
<Realm allRolesMode="strictAuthOnly"
className="org.apache.catalina.realm.DataSourceRealm"
dataSourceName="/jdbc/collabserver"
localDataSource="true"
roleNameCol="user_admin"
userCredCol="user_password"
userNameCol="user_login"
userRoleTable="user"
userTable="user">
<CredentialHandler
className="org.apache.catalina.realm.MessageDigestCredentialHandler"
algorithm="md5"
/>
</Realm>
<Realm allRolesMode="strictAuthOnly"
className="org.apache.catalina.realm.JNDIRealm"
connectionURL="ldap://ldap.example.com:389"
userPattern="uid={0},dc=example,dc=com"
roleBase="dc=example,dc=com"
roleSearch="(&(objectClass=groupOfUniqueNames)(uniqueMember={0}))"
connectionName="cn=read-only-admin,dc=example,dc=com"
connectionPassword="password"
/>
</Realm>The
roleSearchparameter above defines the pattern used to identify user membership in a group. It uses standard LDAP query format syntax. - Verify that the
collaborator-authenticationparameter remainstrueas for regular authentication:<Parameter description="Is the Collaborator database used for authentication?" name="collaborator-authentication" override="false" value="true"/> - In ADMIN > General > SSO tabbed page set the Enable LDAP lookup setting to "Yes" and in Username parameter field specify the name of SAML assertion parameter that contains the LDAP username.
Technical details of LDAP/AD Synchronization
For mapping user membership in groups Collaborator uses the group's fully qualified domain name (FQDN) retrieved from the LDAP or AD. It checks if some of existing user groups has matching FQDN and adds the user to this group on success. Otherwise, it creates a new group and adds the user to the new group.
To name the new group Collaborator uses the first entry of group's fully qualified domain name (FQDN). For example, a group having the "ou=ccusers,dc=example,dc=com" FQDN will have the ccusers title. If some other group already has the same title, Collaborator will append the ordinal number to the group title: ccusers1, ccusers2 and so on.
On every login Collaborator checks existing groups created via LDAP or Active Directory synchronization and actualizes user membership in those groups. Such algorithm allows to keep a consistency between Collaborator and LDAP or Active Directory.
Troubleshooting
If you experience troubles with single sign-on authentication and cannot login to your Collaborator server (wrong redirect URLs, cannot login as admin, and so on), you can disable SAML single sign-on authentication via the -Dcom.smartbear.server.sso.disable=true Java VM option.
Known Issues With OneLogin Server
When users log out from OneLogin server, they still remain logged in Collaborator server. For some reason, OneLogin server does not trigger the Collaborator SLO endpoint when user logs out directly from OneLogin server. However, when users log out from Collaborator server, they will be logged out both from Collaborator server and from OneLogin server.
See Also
Configure Single-Sign-On via Java Servlet
Configure HTTPS
Single Sign-On


