This topic describes how to setup Collaborator integration with JIRA issue-tracking system. To learn general principles of how any issue-tracking integration operates, see Issue-Tracking Integrations: Overview.
-
Open the Collaborator login page in a browser and log in to Collaborator as an administrator.
-
In Collaborator, go to Admin > Remote System Integration
-
Switch to the Configure Remote Systems tab.
-
In the New Remote System Configuration section, select JIRA and click Create. This will display the configuration settings.

Do not confuse JIRA and JIRA Legacy configurations. JIRA Legacy configuration is for legacy integrations that were created with earlier versions of Collaborator. 
-
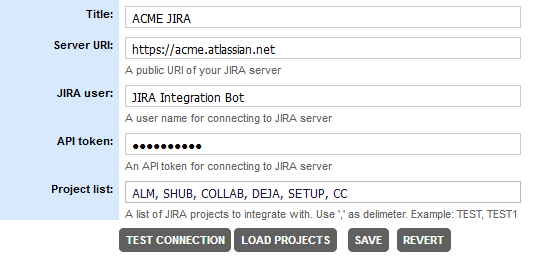
Specify the setting values:
Setting
Description
Title
The configuration name as it will be displayed in Collaborator user interface.
Server URI
The JIRA server's URL and port.
For instance: https://jira.acme.com
JIRA user
The user name that Collaborator will use for connecting to JIRA server.
The specified user must have read-write permissions to JIRA projects. Administrator permissions are NOT required. You may specify a regular user, or create a dedicated user for this integration.
API token
The API token to use for connecting to JIRA server.
To generate API token, log in to https://id.atlassian.com/manage/api-tokens, click Create API token, specify token caption and click Create.
See Atlassian documentation for detailed information about API tokens.
After specifying these values, you can click Test Connection to verify if you entered data correctly.
Setting
Description
Project list
A string containing the keys of JIRA projects to integrate with.
Tip: Click Load Projects to read project keys from the JIRA instance specified by the Server URI setting. Project keys are case-insensitive. The Project List field can contain up to 2000 characters.
-
After you specified the values, click Save. This will create a JIRA configuration.
-
Scroll the Admin > Remote System Integration screen up to the Integration Status section. This section allows you to quickly enable or disable integrations with remote systems.
-
Locate the Enable JIRA Integration setting and change it to Yes.
-
Once the JIRA configuration is enabled, automatic linking for the specified remote systems will be enabled in all active templates. However, Collaborator administrators may enable or disable linking per each template through its Automatically Add Remote System Links setting.
Besides that, administrators can enable the ability to export review defects to the selected issue-tracking system. To enable defect export, go to the Review Templates screen, edit the appropriate template, change the Automatically Create New Work Item for External Defects setting for that specific system field to "Enabled" and select which project will be pre-selected in the dialog that suggests creating a ticket/work item.
Now the integration between Collaborator and JIRA is configured and running.
