
This topic describes how to establish single sign-on between an Atlassian Crowd OpenID server and Collaborator. To learn general principles of how single sign-on operates, see Single Sign-On.
(Optional) Enable HTTPS Connections
Single sign-on servers mostly use HTTPS connections, so you will likely need to enable it for Collaborator server as well. For instructions, please see Configure HTTPS. Do not forget to restart the Collaborator server to apply changes.
Install and Configure Crowd Server
-
Install Atlassian Crowd server.
-
Log in to your Crowd server as an administrator.
-
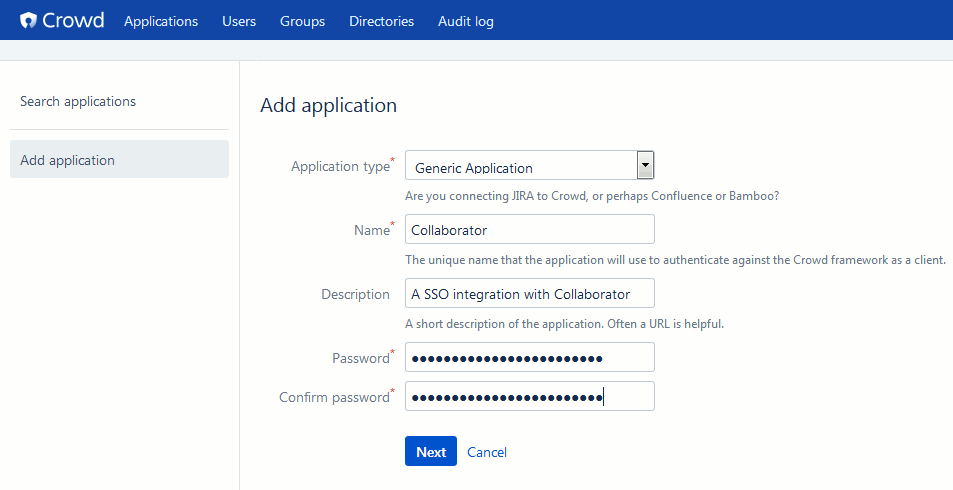
Add new application integration: Select Applications from the main menu and then click Add Application. This will display the application settings.
-
Specify the setting values:
Click Next
-
Specify the URL and the remote IP address of your Collaborator server. Specify port number, if you are not using a proxy. You can click Resolve IP Address, which prompts Crowd to resolve the IP address for your application.

Your Collaborator server must be accessible to SSO server and vice versa. Configure a firewall or enable tunneled connections to do so. 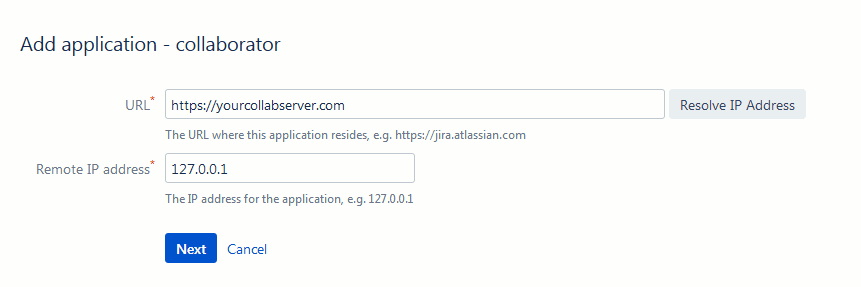
Click Next
-
Select one or more directories that this application can use for authentication and authorization:
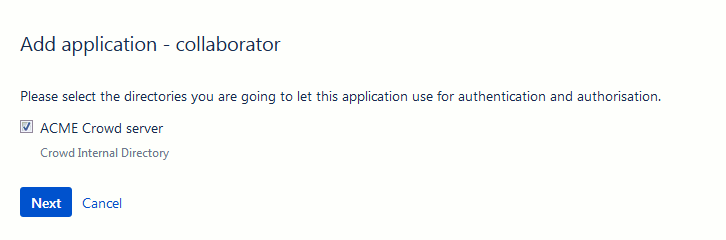
Click Next
-
Specify the users who are authorized to access the application.
Do one of the following: either select Allow all users to authenticate, to grant application access to all users defined in the directory, or select one or more groups you wish to have access, and click Add Group.
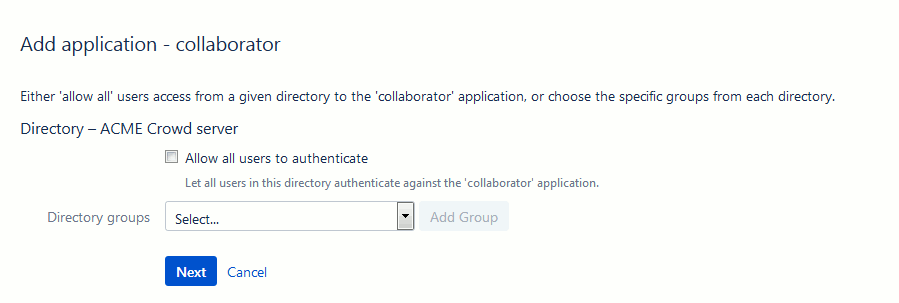
Click Next
-
Confirm the details for your application and click Add Application.
-
If you use proxy server, switch to the Remote addresses tab of application settings and add the proxy server's IP to the list.
Configure Collaborator Server
-
Open the Collaborator login page in a browser and log in to Collaborator as an administrator.
-
In Collaborator, go to Admin > Single Sign-On.
-
In the New SSO Configuration section select CROWD SSO configuration type and click Create. This will display the configuration settings.

Click the image to enlarge it.
-
Specify the setting values:
OpenID endpoint URL The URL where to redirect users for single sign-on procedure, if a session is not already established.
The endpoint typically has the following format:
http(s)://yourcrowdserver:8095/openidserver/opCrowd server URL The URL of your Crowd server (including port number).
The Crowd server URL typically has the following format:
http(s)://yourcrowdserver:8095/crowdCrowd application name and Crowd application password The name and password of Crowd application for Collaborator integration.
This is the application that we have created on the Crowd server earlier.
Enable Crowd group sync Specifies whether Collaborator should synchronize its native groups with group information from the Crowd server.
Once enabled, on every logging-in, Collaborator will check user membership in groups on the Crowd server, create new groups (if needed), and automatically add this user to the corresponding groups on the Collaborator server. This operation could be time-consuming, if there are multiple groups on your Crowd server. If you have any problems, check the server log.
Automatic group creation filter A Java-style regular expression used to filter Crowd groups before automatic group creation. Any group name that does not match the pattern will be excluded.
-
After you specified the values, click Save. This will create a Crowd OpenID configuration.
-
If you have multiple configurations, press Make Active to mark current configuration as active.
-
Scroll the Admin > Single Sign-On screen up to the Single Sign-On (SSO) Status section and change the Enable Single Sign-On setting to Yes.
Now the integration between Collaborator and Crowd OpenID server is configured and running. Further attempts to log into Collaborator server will be processed by the sign-on server.
Troubleshooting
If you experience troubles with Crowd OpenID single sign-on authentication, please check the following:
- Ensure that Crowd home directory is specified in {CROWD_INSTALL}/crowd-webapp/WEB-INF/classes/crowd-init.properties file. Check that this directory is writable.
- Check that CrowdID add-on is installed and configured. By default, it is installed and configured during the installation of Crowd server using the Crowd Setup Wizard. If you have skipped those steps, then install and configure it as described in Atlassian Documentation.
- If all user attempts to log-in to Collaborator server are always redirected to
http(s)://yourcrowdserver:8095/openidserver/(even when they are already logged-in on Crowd server), please verify that the OpenID endpoint URL value is specified correctly. Namely, that the URL ends with/openidserver/op
If the problem persists, you can disable single sign-on authentication via the -Dcom.smartbear.server.sso.disable=true Java VM option.
See Also
Configure Single Sign-On via SAML
Configure HTTPS
Single Sign-On