
Now we can create the description file that contains information about our script extension. This file will be used to install the extension into TestComplete:
-
The description file has the XML format. To create it, you can use any text or XML editor.
Launch your editor and enter the following text to it:
XML
<?xml version="1.0" encoding="UTF-8"?>
<ScriptExtensionGroup Name = "My Extensions">
<Category Name="Runtime Objects">
<ScriptExtension Name = "WMI Object" Author = "SmartBear Software" Version = "1.1 test" HomePage = "smartbear.com">
<Script Name = "wmiCode.vbs">
<RuntimeObject Name = "WMI">
<Description>
Provides access to the WMI service.
</Description>
</RuntimeObject>
</Script>
<Description>
Provides scripting interface to WMI objects.
</Description>
</ScriptExtension>
</Category>
</ScriptExtensionGroup> -
Save the file under the description.xml name to the C:\My Extension Files\Extension1 folder (that is, to the folder that contains the script file).

Name the file description.xml. When you install script extensions into TestComplete the latter searches for the file with this name and retrieves information from it.
Now we will describe the file contents.
The root element is ScriptExtensionGroup. It corresponds to a collection of script extensions. It has the Name attribute that contains an arbitrary text about the script extensions included into the collection. The ScriptExtensionGroup element can have one or more children Category elements that define the categories to which the extensions belong. The category names are shown in the Script Extensions dialog and are used to group extensions into the appropriate categories (see the image below). In this tutorial, we specify that our sample WMI object belongs to the Runtime Objects category.
Each script extension is represented by the ScriptExtension element. Its attributes provide information about the extension. This info is also shown in the Script Extensions dialog (see the image below). The extension’s description is specified by the child Description element:
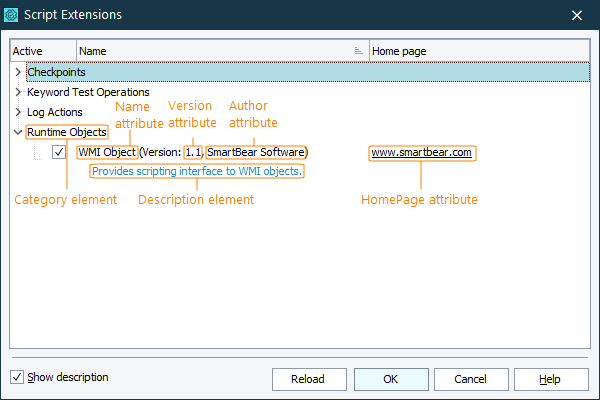
A combination of the Name, Author and Version attributes are used as the extension’s identifier. If the extensions list already contains an extension with the same Name, Author and Version value, a new extension will not be installed into the list. In this tutorial, we used the 1.1 test value for the Version attribute. We did so to avoid conflicts with the pre-installed WMI Object extension.
The ScriptExtension element contains a child Script element. It corresponds to the script unit that will be included into the extension. The Name attribute of this element specifies the name of the script file. In our case it is wmiCode.vbs:
XML
[description.xml]
...
<Script Name="wmiCode.vbs">
<RuntimeObject Name = "WMI">
...
</RuntimeObject>
</Script>
The Script element also has the InitRoutine and FinalRoutine attributes that specify the script functions that perform the initialization and finalization actions. At this time, we will not use the attributes.
The Script element may contain one or more child RuntimeObject elements. These elements correspond to custom scripting objects that extend the TestComplete object model. In our tutorial, we only use one RuntimeObject element. It corresponds to our WMI object. The element’s Name attribute specifies the object name that is used to address the object in scripts. In our case, the object name is WMI:
XML
[description.xml]
...
<Script Name="wmiCode.vbs">
<RuntimeObject Name = "WMI">
...
</RuntimeObject>
</Script>
The object name must be a valid script identifier for all of the scripting languages supported by TestComplete. The easiest way to follow this rule is to use the name that starts with a letter and contains only letters, digits and underscore characters.
Also, the object name must be unique. That is, it must not coincide with the names of other top-level objects.
The RuntimeObject element may have the Namespace attribute, which we do not use in this tutorial. This attribute serves as an additional level in the objects hierarchy and lets you organize objects added by different script extensions under one namespace. For more information about using namespaces in script extensions, see Creating Runtime Objects - Basic Concepts.
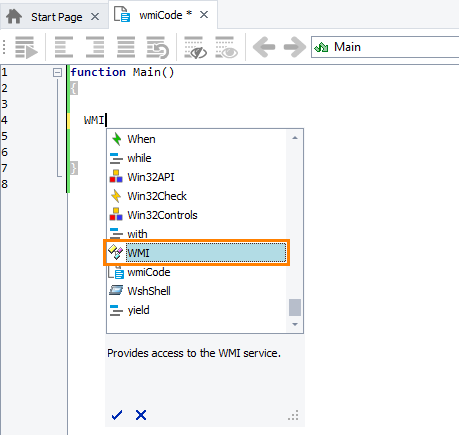
The RuntimeObject element contains a child Description element that specifies the object’s description to be displayed in the Code Completion window:
The creation of the description file is not finished. We will modify the file as we add properties and methods to the object.
For detailed information about elements and attributes that are used in the description files, see topics of the Script Extension Files section.
 Prev
Prev
See Also
Script Extensions
Script Extension Files
Structure of the Description File