
 |
Object checkpoints are deprecated. We do not recommend using them. Use property checkpoints instead. |
You can create object checkpoints both during test recording and design time. To help you set up object checkpoints, TestComplete includes the Object Checkpoint wizard. The rest of this topic provides step-by-step instructions on using the wizard.
 1. Launching the Wizard
Note for Mobile Testing: To create an object checkpoint for an object in a mobile application, you can select the object on the Mobile Screen. Make sure that the Mobile Screen window is not hidden when you launch the checkpoint wizard.
In addition, note that the application under test and the mobile device, where it is running, must be prepared for testing in order for TestComplete to be able to access the application’s objects.
Connecting to Mobile Device Clouds and Opening Testing Sessions
Preparing for Android Testing (Legacy Mobile Support)
1. Launching the Wizard
Double-click any object checkpoint in the Keyword Test editor.
2. Specifying the Object to Verify
First of all, the wizard prompts you to specify the object whose data you want to verify. You can do this in one of the following ways:
-
Pick the object with the target glyph
-
Drag the target glyph (
 ) to the desired object in the tested application.
To select an object in a mobile application, drag the target glyph to the desired object on the Mobile Screen (see Select an Object on the Mobile Screen).
While dragging, a red frame appears around the object that is currently under the mouse pointer.
-
Drop the glyph onto the object.
-
-
Point to the object and fix
-
Click the
 glyph.
 -
Perform the actions needed to activate the desired object in the tested application (for example, invoke the popup window or set the input focus to the object).
-
Position the mouse pointer over the desired object.
To select an object in a mobile application, move the mouse pointer over the desired object on the Mobile Screen (see Select an Object on the Mobile Screen).
A red frame appears around the object that is currently under the mouse pointer.
-
Press the Select object shortcut, Shift+Ctrl+A (this shortcut can be changed in the Global Shortcuts options).
-
-
Select the object from Test Visualizer
This functionality is available: -
only in desktop and classic web tests,
–and –
-
if the Visualizer images contain object information, that is, they were captured in the Capture tested object properties mode.
-
Click the
 button. The Visualizer Frame window will open and display the image (frame) that is currently selected in the Test Visualizer panel.
 -
Select the desired object on the image in the Visualizer Frame window (TestComplete highlights an object under the mouse cursor with a red frame when you are moving the cursor over the image).
-
TestComplete will display the name of the selected object in the Object box and show the object image in the Preview area.
-
Enter the object name manually
-
Enter the full name, full mapped name, or alias of the desired object in the Object box.
-
Tips for selecting objects:
Using the second approach may be more convenient if you need to manipulate the application before selecting an object. For example, you can open and point to popup windows, tooltips, and other objects that are hidden when being inactive.
To select a non-onscreen object, such as a process, enter the object name manually.
Instead of selecting the object, you can copy its name from the Object Browser, Object Spy, keyword test, or script code beforehand and paste it into the Object box.
Despite the way you specify the object name, you can change or correct it directly in the Object box.
If the Map object names automatically option is selected, TestComplete automatically adds the specified object to the Name Mapping repository (if it is not there already). Your tests will take the object alias from the repository.
Once you have selected the object to verify, click Next to proceed.
3. Specifying the Baseline Data
Object checkpoints compare the actual data of the tested application’s object with the baseline data stored in one of the project’s Stores | Objects collection items. When creating an object checkpoint, you can either store the current object data to the Objects collection and then use it as a baseline data, or select an existing Objects collection item that holds the baseline data.
-
To use the current object data as the baseline one:
-
Select Retrieve data from an object.
-
In the Stores object name box, enter the name to assign to the new item that will be created in the Objects collection. The default name generated by TestComplete is based on the name of the object name.
-
Click Next in the wizard.
-
The next page of the wizard lets you specify whether you want to verify the data of the selected object only or the data of its child objects as well.
-
To store the data of the selected object only:
-
Select the Store the selected object data option and click Next.
-
On the Select Properties to Store page of the wizard, select the properties that you want to verify. To do this, select the properties in the Available list and click
 to move them to the Selected list.
-
-
To store the data of the selected object along with the data of all of its child objects:
-
Select the Store data of the selected object and its children option and click Next.
-
The next page of the wizard will display a list of child objects. In the list, check the objects to be included in verification.
Note: You can also select the needed objects later, while choosing the object data to be verified. 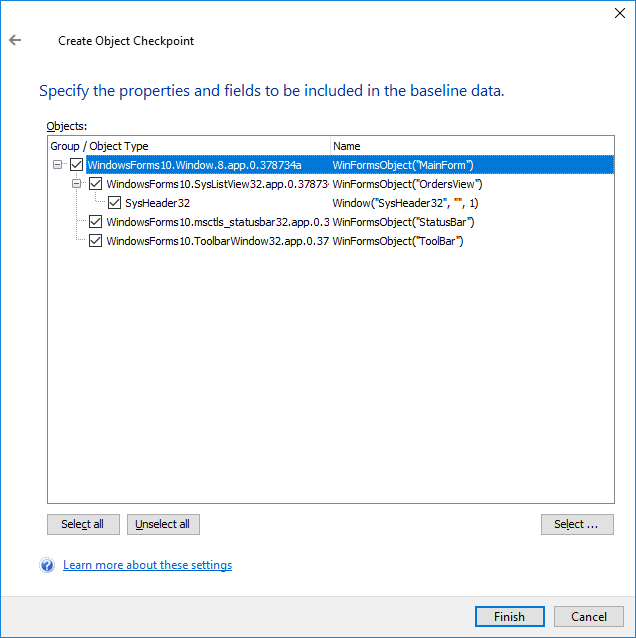
-
To choose the object properties that you want to verify, click Select. The Store Object Properties and Fields dialog will appear. It displays the hierarchy of objects and their properties that will be included in the baseline data for the checkpoint:
-
(Optional.) Select the objects to be included in the baseline data in the tree on the left side of the dialog. To quickly check or uncheck all the objects, use the Select All and Unselect All buttons.
-
To specify a set of object properties to be included in the baseline data:
-
Select the object in the tree on the left side of the dialog.
-
Select the object property in the Available list and click
to move it to the Selected list. To quickly select all the available properties, click  .
. -
Once you have selected the object data to store, click OK to close the dialog and return to the Object Checkpoint wizard.
Tip: Setting the properties to save individually for each object can be tedious. To simplify it, you can define object groups and specify properties to store for the whole group at once. In this case, TestComplete will automatically determine if the object belongs to a group and automatically choose the appropriate properties for saving. For information on creating and using object groups, see Store Object Properties Dialog. Notes:
-
Object checkpoints cannot verify properties that return object values and indexed properties (that is, properties that require parameters to get a value). So, these properties are not included in the Available list. To verify such properties, you can use property checkpoints or create custom verification instructions.
-
Some “native” properties and fields of Open Application objects are unavailable to TestComplete. For more information, see Object Properties, Fields and Methods That Are Unavailable to TestComplete.
-
By default, protected and private properties are hidden. To be able to view and verify them, enable the Show hidden members option. See Access to Properties.
-
-
-
-
-
To select an existing baseline item:
-
Select Use a stored object data.
-
Choose the Objects collection item that holds the desired data from the Stores object name list.
-
4. Closing the Wizard
Click Finish to exit the wizard. TestComplete will add the checkpoint statement for the specified object to your test.
|
If both the Update objects option in the Stores settings and the Update attribute of the baseline Objects collection item are enabled, the checkpoint will update the stored data of the Objects item with the actual data of the appropriate tested object(s) instead of verifying it. In order for the checkpoint to perform the verification, uncheck the stored object Update attribute. |
See Also
Object Checkpoints
About Object Checkpoints
Object Checkpoint Wizard
Mobile Screen Window
Selecting an Object on the Mobile Screen (Android Testing)
Select an Object on the Mobile Screen (iOS Testing)