
 |
The Network Suite functionality is deprecated. We don’t recommend using it for distributed testing. Consider using a CI/CD system for managing distributed tests. See Migrating Distributed Tests to CI/CD Systems for details. In case you need to run web tests on multiple environments in parallel, you can also try using your project’s Execution Plan. |
 Common Requirements
 |
After configuring your remote computers, make sure that, when you connect to them, no additional login screens or account selection windows appear. |
Common Requirements
Each computer (whether master or remote) used in distributed testing must be configured as follows:
-
TestComplete 15 or TestExecute 15 must be installed on the computer.
Use the same version of TestComplete and TestExecute on all computers. -
TestComplete 15 Service must be running on the computer (by default, the service is launched automatically at Windows startup).
-
If a firewall or antivirus is installed on the computer:
-
Add TestComplete 15, TestExecute 15 and TestComplete 15 Service to the list of trusted applications. To learn how to allow TestComplete through the built-in Windows Firewall, see TestComplete and Windows Firewall.
-
Allow traffic through the TCP ports used by TestComplete and TestComplete Service. By default, these ports are 6095 - 6097. You can change the ports in the Tools > Options > Engines > Network Suite dialog.
-
-
If a computer used in distributed testing is an Amazon EC2 computer, the security group, in which it is launched, must have inbound rules that allow traffic through ports used by TestComplete and TestComplete Service (see above).
To learn how to configure security groups, please see Amazon EC2 documentation.
-
The TCP ports for remote connections in the Network Suite Options must be the same on all computers.
-
On Windows XP and Windows Server 2003, install the Remote Desktop Connection 6.0 client from here:
Configuring Remote Computers
1. Enable Remote Desktop Connection
To run distributed tests on remote computers, you need to enable remote desktop connections to them. You also need to add the user accounts for remote login to the Remote Desktop Users group on the remote computers. To do this:
-
Open the Control Panel > System applet.
-
On Windows 10, Windows 8.1 and Windows Server 2012:
-
In the left part of the System window, click Remote settings.
-
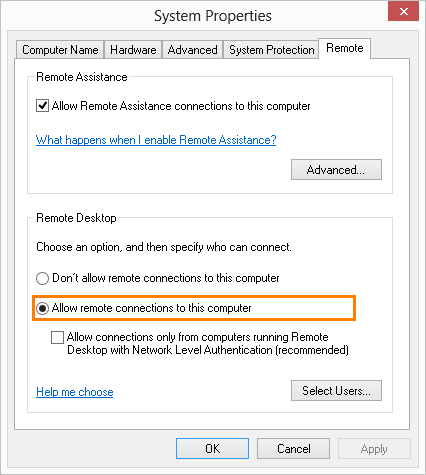
In the dialog that opens, select Allow remote connections to this computer.
On Windows Vista, Windows 7 and Windows Server 2008:
-
On the left of the System window, click Remote settings.
-
In the dialog that opens, select the Allow connections from computers running any version of Remote Desktop (less secure) check box or the Allow connections only from computers running Remote Desktop with Network level Authentication (more secure) check box.
On Windows XP and Windows Server 2003:
-
In the System Properties dialog, switch to the Remote page.
-
Select the Allow users to connect remotely to this computer check box (or similar).
-
-
Click Select Users. The Remote Desktop Users dialog opens.
-
Specify the user accounts allowed to access the computer, and click OK.
Notes:
You will use these accounts in your master test project to log in to the remote computers.
These user accounts must have non-empty passwords.
-
Click OK to close the System properties and save the changes.
2. Configure the Privilege Level for TestComplete (TestExecute)
On remote computers with Windows Vista, Windows 7, Windows Server 2008 and later operating systems, choose whether to run TestComplete (TestExecute) with administrator privileges:
-
If TestComplete (TestExecute) does not need administrator privileges to run the slave project, configure TestComplete (TestExecute) to run without them:
-
On the remote computer, open Windows Explorer or any other file manager and find the executable file of TestComplete (TestExecute). The file name is TestComplete.exe for TestComplete and TestExecute.exe for TestExecute.
-
Right-click the TestComplete (TestExecute) file and select Properties from the context menu.
-
In the file properties dialog, switch to the Compatibility tabbed page.
-
Uncheck the Run this program as an administrator option.
-
Click OK.
-
-
If TestComplete (TestExecute) needs administrator privileges to run the slave project, disable User Account Control (UAC) on the remote computer. To learn how to disable UAC, see Using TestComplete With Administrator Privileges.
Disabling UAC reduces Windows security.
3. Configure Windows Server Computers
If a remote computer is running a server edition of Windows, restrict users to one remote session.
To do this, on the remote computer, open Group Policy (to do this, type gpedit.msc in the Search dialog and press Enter). In the Group Policy editor:
On Windows Server 2019 or Windows Server 2016
-
In the tree on the left, select Local Computer Policy > Computer Configuration > Administrative Templates > Windows Components.
-
Then, select Remote Desktop Services > Remote Desktop Session Host > Security.
-
In the Setting list on the right, double-click the Require use of specific security layer for remote (RDP) connections item.
-
In the subsequent dialog, select Enabled.
-
In the Security Layer drop-down list of the dialog, select Negotiate.
-
Click OK to close the dialog and save the changes.
On Windows Server 2012 or Windows Server 2008
-
Select Computer Configuration > Administrative Templates > Windows Components.
-
Then select Remote Desktop Services > Remote Desktop Session Host > Connections.
-
In the list on the right, double-click the Restrict Remote Desktop Services users to a single Remote Desktop Services session item.
-
Select Enabled and click OK.
On Windows Server 2003
-
Select Computer Configurations > Administrative Templates > Windows Components.
-
Then select Terminal Services.
-
In the list on the right, double-click the Restrict Terminal Services users to a single remote session item.
-
Select Enabled and click OK.
In addition, if a remote computer is running in the Remote Administration Server mode and there are user sessions opened on it, you need to close unnecessary sessions. To do this:
-
Log on to the remote computer locally.
-
Click Start > Administrative Tools > Remote Desktop Services > Remote Desktop Services Manager. This will open the Remote Desktop Services Manager window.
-
Select the server in the left pane of the window. In the right pane of the window, switch to the Users tabbed page.
-
If there are several remote sessions, select one of the users with the Remote Desktop Protocol session, right-click it and select Log Off in the context menu.
4. Configure Group Policies
Click Start, select Run, type gpedit.msc and press Enter. This will open the Group Policy Editor.
In the editor:
-
Disable the following group policies on the remote computers:
-
Always prompt client for password upon connection
-
Prompt for credentials on the client computer (on Windows Vista and later)
Note: If the remote computer belongs to a domain, these group policies must also be disabled on the domain controller. Ask your system administrator to do this. To disable these policies:
-
In the tree on the left, select the following category:
On Windows 10, Windows 8.1, Windows 7 and Windows Server 2012:
Local Computer Policy > Computer Configuration > Administrative Templates > All Settings
On Windows Vista and Windows Server 2008:
Local Computer Policy > Computer Configuration > Administrative Templates > Windows Components > Remote Desktop Services > Remote Desktop Session Host > Security
On Windows XP and Windows Server 2003:
Local Computer Policy > Computer Configuration > Administrative Templates > Windows Components > Terminal Services > Encryption and Security
-
In the list on the right, double-click the Always prompt client for password upon connection item.
-
Select Disabled and click OK.
-
-
If the remote computer runs Windows Vista, Windows 7, Windows Server 2008 and later operating systems, also do the following:
-
In the tree on the left, select Local Computer Policy > Computer Configuration > Administrative Templates > All Settings.
-
In the list on the right, double-click the Prompt for credentials on the client computer item.
-
Select Disabled and click OK.
-
-
If the remote computer runs Windows 10, also do the following:
-
In the tree on the left, select Local Computer Policy > Computer Configuration > Administrative Templates > Windows Components > Remote Desktop Services > Remote Desktop Session Host > Security.
-
In the Setting list on the right, double-click the Require use of specific security layer for remote (RDP) connections item.
-
In the subsequent dialog, select Enabled.
-
In the Security Layer drop-down list of the dialog, select Negotiate.
-
Click OK to close the dialog and save the changes.
-
-
If the remote computer is configured to show a logon message when a user logs on, disable the message:
-
In the tree on the left of the Group Policy editor, select Configuration > Windows Settings > Security Settings > Local Policies > Security Options.
-
In the list on the right, double-click the Interactive logon: Message title for users attempting to log on item.
-
In the resulting dialog, set the title of the logon message to an empty string and click OK to save the changes.
-
Then, right-click the Interactive logon: Message text for users attempting to log on item.
-
Set the text of the logon message to an empty string and click OK.
If the message persists:
-
On your remote computer, open the Registry editor (click the operating system Start or Windows button, select Run, type regedit and press Enter).
-
Navigate to the following registry key:
HKEY_LOCAL_MACHINE\SOFTWARE\Microsoft\Windows NT\CurrentVersion\Winlogon -
Make sure that its
LegalNoticeCaptionandLegalNoticeTextvalues are set to an empty string.
-
5. Disable Secure Sign-In
Sometimes, Windows is configured so that the user has to press Ctrl+Alt+Delete before signing in to prevent unwanted actions the software that simulates user behavior may perform. TestComplete does not provide any means to work around this feature, so we recommend you to turn it off. To do that:
-
On the target PC, press Win+R to open the Run dialog.
-
Type
control userpasswords2and press Enter. -
In the subsequent User Accounts dialog, switch to the Advanced tab.
-
Unselect the Require users to press Ctrl+Alt+Delete option.
-
Click OK or Apply.
6. Disable Additional Screens
To avoid issues during the testing, make sure that, when you connect to the remote machine, its desktop opens up immediately – that is, no additional screens appear (such as the login form, account selection window, or RDP Certificate Warning windows). To learn how to disable these additional screens, contact your IT department.
Test Project Requirements
-
For each computer in the master project’s Hosts collection, you must specify the user account (domain, user name and password) to log in to that computer.
Alternatively, you can specify a common user account for multiple hosts in the network suite properties of the master project.
Note: User accounts must have non-blank passwords. -
The master project’s NetworkSuite project item must have the Jobs collection with a list of jobs to run. Each job must have at least one task.
-
For each task in the master project, you must specify a host on which the task will be run (the Host property) and the test that will be run (the Project file name and the Test properties).
-
Remote computers must have access to the projects they will run:
-
Place the projects in folders on the remote computers where they will run.
If the tests belong to your master project or to other projects residing on the master computer, you can configure the master project to copy them to the appropriate remote computers automatically or you can copy them manually. See Copying Slave Projects to Remote Computers.
Notes:
-
If your slave project or project suite has external project items or projects that reside outside its folder, TestComplete will not copy them. Move them to the appropriate folder or copy them to the remote computers manually by using any file manager. Make sure that the resulting project or project suite on the remote computer contains valid paths to those external items.
-
If you use the Network Suite wizard to create distributed tests, your master project is configured to copy the corresponding tests from the master project to the remote computers automatically.
-
– or –
-
Place the projects in a shared network folder. In this case, the user accounts used to log in to the remote computers must have read and write permissions for this shared folder.
Note: We do not recommend that you share the same project or project suite among several computers, as the computers may fail to open the shared project or project suite simultaneously.
-
Required Plugins
The distributed testing functionality is implemented by the following plugins. They are installed and enabled automatically during TestComplete installation.
| Plugin Name | Description |
|---|---|
| Network Suite Core | Provides the NetworkSuite project item (which must be added to projects manually) and the NetworkSuite scripting object, which is available if the project has the NetworkSuite item. |
| Network Suite Host List Editor | Provides the Hosts editor that lets you configure the list of hosts (i.e. computers that can take part in distributed testing controlled from the given project), and set up properties of individual hosts. |
| Network Suite Job List Editor | Provides the Jobs editor that lets you configure the list of jobs (collections of tasks) that belong to the network suite of the given project, and set up properties of individual jobs. |
| Network Suite Run State | Provides the Run State page for the NetworkSuite project item editor, which lets you monitor the network suite, job or task run. |
| Network Suite Task List Editor | Provides the Tasks editor that lets you configure the list of tasks that belong to the given job in the network suite, and set up properties of individual tasks. |
Note that the Network Suite Core plugin must be enabled in TestComplete (TestExecute) on both master and remote computers.
If you experience issues when working with network suites, you can check whether the plugins are enabled in the File > Install Extensions dialog.
TestComplete 32-bit executable is located in the <TestComplete>\Bin folder.
TestComplete 64-bit executable is located in the <TestComplete>\x64\Bin folder.
TestExecute 32-bit executable is located in the <TestExecute>\Bin folder.
TestExecute 64-bit executable is located in the <TestExecute>\x64\Bin folder.
See Also
Distributed Testing
Projects Participating in Distributed Testing
Copying Slave Projects to Remote Computers
Opening User Sessions on Remote Computers
Creating and Running Distributed Tests
Running the Network Suite, Jobs and Tasks