About Test Runner REST API
The Test Runner REST API allows accessing the product and controlling test runs from third-party tools. You can use it to access TestComplete project suites, get their tests, start test runs and get the test results. In addition, you can use the API to control TestComplete (or TestExecute) installed on a remote computer.
More on APIs
If you are interested in API testing, you can use ReadyAPI, another product by SmartBear for functional and security API testing. See About Integration With ReadyAPI and SoapUI.
To learn about the TestComplete API that allows accessing tested applications, objects and simulating actions on them, see Test Engine REST API.
Important
 Enabling the Test Runner REST API may impair your computer’s security.
The API can be used to get unauthorized access to your test host. The API does not provide enough security to use it in public networks. SSL/HTTPS is not used, so your credentials can be compromised and request forgery can be used.
Requirements
For computers where you will run tests
Your test hosts (the computers where you will enable the API and run tests) must meet the following requirements:
-
TestComplete 15 or TestExecute 15 must be installed on the computer.
-
TestComplete 15 Service must be running on the computer (by default, the service is launched automatically at Windows startup).
-
The Test Runner API must be enabled. To learn how to enable the API, see below.
-
The TCP port through which you will access the API must be opened inbound by the firewall on the test host. To learn how to specify the port and how to allow traffic through it, see below.
-
The user account under which you want to run tests must be allowed to connect to your test host via RDP:
-
To be able to connect to your test host and create interactive user sessions on it, configure group policies on the host in the following way:
-
If your TestComplete tests require administrator privileges to run, disable User Account Control (UAC) on the test host. To learn how to disable UAC, see Using TestComplete With Administrator Privileges.

Disabling UAC reduces Windows security.
Requirements for test projects
-
The project suite must not have any external dependencies. For example, if the test uses an Excel or CSV data file, the file must be included in the project suite. To learn how to add external files to your project suites, see Adding Arbitrary Files to Projects.
-
The tests you will run must not take parameters.
-
Your tests must be computer-independent. See Avoiding Computer-Specific Settings.
-
The tests you will run must have access to all the resources they need to run from the test host. For example, your tests must be able to access your tested application from the test host. If your tests get test data from a data storage, they must be able to access it from the test host.
-
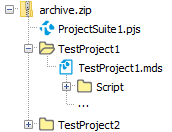
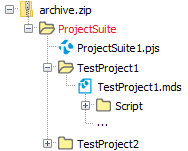
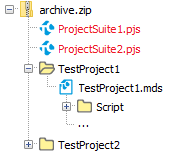
 Your project suite and all its files must be packed to a ZIP archive:
-
The resulting .zip archive should include all the files needed for your tests to run.
-
The project suite file (.pjs) should be in the archive root. Do not place it in a subfolder.
-
The archive must include only one project suite.
-
To Enable the API
1. Enable the API
By default, the Test Runner API is disabled. You can enable it:
Using a batch file
The batch file is shipped with TestComplete (and TestExecute) and resides in the <TestComplete> folder.
-
Log in to your test host (the computer where you will run tests).
-
Locate the batch file and run it as administrator:
<TestComplete 15>\Bin\TestCompleteService14RestApiEnable.bat
-
Read the security warning. If you agree, type Y to confirm enabling the API.
-
When asked for an API port, enter the needed port, or press Enter to use the default port: 1880.
The batch file will enable the API, restart TestComplete Service and will close automatically.
Manually, by using the Windows registry
-
Log in to your test host (the computer where you will run tests).
-
Launch the Registry editor (regedit.exe).
-
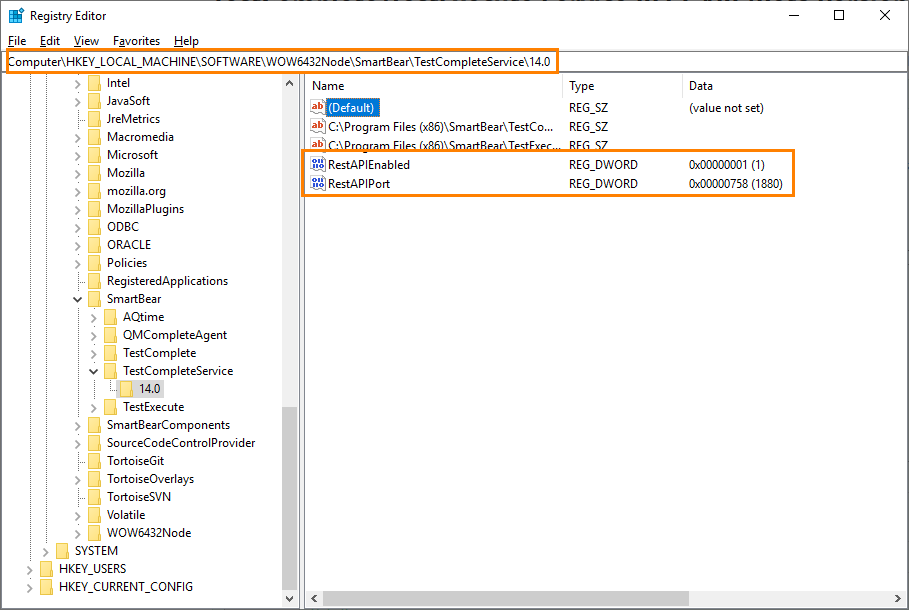
Locate one of the following Registry keys (depending on whether your computer is running under a 32-bit or 64-bit operating system):
On the 64-bit version of Windows:
HKEY_LOCAL_MACHINE\SOFTWARE\Wow6432Node\SmartBear\TestCompleteService\15.0On the 32-bit version of Windows:
HKEY_LOCAL_MACHINE\SOFTWARE\SmartBear\TestCompleteService\15.0 -
Create a DWORD value named
RestAPIEnabledand set it to 1. -
Create a DWORD value named
RestAPIPort. Set it to the port you want to use to access the API. -
For the changes to come into effect, restart TestComplete Service running on the test host:
2. Configure your firewall to allow traffic through the API port
-
On test host, open the Windows Control Panel.
-
In the search box, type Firewall and then select Windows Firewall.
-
On the left of the Windows Firewall window, click Advanced settings.
-
In the Windows Firewall with Advanced Settings window, click Inbound rules.
-
Click New Rule in the Actions panel of the window.
-
In the resulting New Inbound Rule Wizard, create a new rule:
-
On the Rule Type page, select Port.
-
On the Protocol and Ports page, select Port. In the local ports edit box, enter the API port (by default, 1880).
-
On the Actions page, select All the connections and click Next.
-
On the Profile page, select the network location for which you want to open the port.
-
On the Name page, in the Name field, enter the rule name.
-
API Explorer
The interactive API documentation is available:
Locally at:
 http://<test-host-name>:<port>
where test-host-name is the IP or network name of the computer where the API is running and port is the port through which you access the API.
For example, to explore the API enabled on your local computer and whose port is 1880:
You can use the API explorer to make API calls directly from your web browser.
In addition, an OpenAPI definition for the API is available at:
You can use the definition to generate a client wrapper, for example.
How to use
Typical workflow
| Step | Operation | Description |
|---|---|---|
| 1. | Prepare your project suite. | Pack your project suite files to a .zip archive. See details.
If needed, place the .zip archive to a shared network folder. Make sure that your remote computer where you will run tests can access that folder. |
| 2. | POST /suites– or – PUT /suites |
Use POST to upload the .zip archive to the remote computer or PUT to give the remote computer access to the .zip archive stored in a shared network folder. Both operations return the project suite ID that you can use in the subsequent request. See details. Note: You cannot use POST to upload the archive via the API explorer because you cannot specify the archive as a binary file. To do this, you can use the cUrl command-line tool. You can find a curl example that uploads a project suite packed to a .zip archive below. |
| 3. | POST /suites/{id}/create_instance |
Create an interactive user session on the remote computer, start TestComplete (or TestExecute) and load the project suite into it. That is, create a project suite instance ready for the run. Return the instance ID you use in subsequent requests. The operation does not wait until the instance is opened and is ready to run tests. To determine when the instance is ready, call the See details. |
| 4. | GET /instances/{id}/runnables |
(Optional) Get a list of tests (projects, script functions, keyword tests, tags, and so on) that can be run. See details. |
| 5. | POST /instances/{id}/run |
Run a test on the remote computer. The parameters specify the desired instance, project and test name. See details. The operation doesn’t wait until the test run is over. It sets the instance state to executing and returns. |
| 6. | GET /instances/{id} |
To determine the end of the run, call the Below is a list of all possible statuses that the operation can return:
|
| 7. | GET /instances/{id}/summary |
Get summary results of the latest test run. Call this operation only after the test run is over. See details. |
| 8. | DELETE /instances/{id} |
Close TestComplete (or TestExecute) on the remote computer and close the user session. See details. |
| 9. | DELETE /suites/{id} |
(Optional.) Delete the project suite from the remote computer. |
1. Prepare your project suite
To run tests on a remote computer, you need to upload your project suite to it. To do this, first you need to pack all the project suite files into a .zip archive. You can use any ZIP archiver to do that.
For the requirements the project suite and the resulting archive must meet, see above.
2. Upload .zip archive
To upload the .zip archive with your project suite to the remote computer, use the POST /suites operation:
curl -u DOMAIN\user:password -X POST https://tchost:1880/1/suites \
-H "Content-Type: application/zip" \
--data-binary "@C:\path\to\project_suite.zip"
The API will return the project suite ID that you can use in further requests:
{
"success": true,
"result": {
"suite": 12345
}
}
3. Open the project suite in TestComplete and create a user session
After you upload your project suite to the test computer, use the POST /suites/{id}/create_instance operation to create an interactive session on the test computer, start TestComplete (or TestExecute) in that session and load the project suite in that TestComplete (or TestExecute) instance. id is the identifier of the project suite you uploaded on the previous step.
curl -u DOMAIN\user:password -X POST https://tchost:1880/1/suites/12345/create_instance
If the remote computer is working under a server operating system, then every call to this operation will create a new user session. If the operating system is a non-server one, this operation will close the existing session and will start a new one.
Here is an example of the response
{
"success": true,
"result": {
"instance": 15743972
}
}
The instance response field is the identifier of the started TestComplete instance with the loaded project suite in it.
Get instance status
A successful response here means the request has been accepted and is being processed. It does not mean a user session has already been opened. To determine that the session has been created, TestComplete has started and the project suite has been loaded, query GET /instances/{id}/ repeatedly until you get ready or error in its result.state response field.
curl -u DOMAIN\user:password GET https://tchost:1880/1/instances/15743972
creating means the instance is still being initialized. If you get error, check the result.message field to learn what went wrong.
{
"success": true,
"result":{
"state": "ready"
}
}
4. Get a list of tests to be run
Before running tests, you can check what runnable items (script functions, keywords tests, tags, project items, projects, and so on) your project suite contains. To do this, use the GET /instances/{id}/runnables operation. id here is the identifier of the instance you created on the previous step:
curl -u DOMAIN\user:password https://tchost:1880/1/instances/15743972/runnables
The operation response looks as follows. The projects.items.name field contains the names of runnable tests:
{
"success": true,
"result": {
"projects": [
{
"items": [
{
"name": "@AllTests"
},
{
"name": "KeywordTests|Main"
},
{
"name": "Script|Unit1|ChangeRecord"
},
{
"name": "Script|Unit1|AddRecord"
}
],
"name": "ProjectName"
}
]
}
}
5. Run a test
To run a test on the remote computer, use the POST /instances/{id}/run?project=...&run_item=... operation. It has the following parameters:
-
id is the identifier of the project suite instance that you created at step 3.
-
project is the name of the project that contains the desired test.
-
run_item is the name of the test to be run. Use the format like “Script|Unit1|Function1” or “KeywordTests|Test1”, that is, the format you see in the response at step 4.
Here are some examples:
-
Run the whole project suite (no project and run_item parameters are specified):
curl -u DOMAIN\user:password -X POST https://tchost:1880/1/instances/15743972/run
-
Run a project:
curl -u DOMAIN\user:password -X POST https://tchost:1880/1/instances/15743972/run?project=ProjectName
-
Run a test in a project:
curl -u DOMAIN\user:password -X POST https://tchost:1880/1/instances/15743972/run?project=ProjectName&run_item=Project|Item|Name
-
Run all the tests that match the
@tag1tag:curl -u DOMAIN\user:password -X POST https://tchost:1880/1/instances/15743972/run?project=ProjectName&run_item=@tag1
 This operation does not support running tests that match a tag expression. As a workaround, in your TestComplete project, create a test item that runs tests that match the needed tag expressions, and then run the test item as described above.
Result
A successful result indicates that the service accepted the request. It does not mean that the test run is over.
{
"success": true,
"result":{}
}
After receiving a request, the service sets the instance state to executing. To detect the end of the test run, query GET /instances/{id} in a loop until you get ready or error in its result.state response field.
curl -u DOMAIN\user:password https://tchost:1880/1/instances/15743972
{
"success": true,
"result":{
"state": "ready"
}
}
ready means the test run is over (passed or failed), and you can get the test results (see step 6). error indicates the test engine faced some unexpected error (rarely), could not complete the run and could not generate test results.
6. Get results
To get the latest test results, use the GET /instances/{id}/summary operation. Here id is the identifier of the desired instance:
curl -u DOMAIN\user:password https://tchost:1880/1/instances/15743972/summary
{
"success": true,
"result": {
"message": "The object \"Customer\" does not exist.",
"status": "error",
"tests": [
{
"name": "Test1",
"status": "passed"
},
{
"message": "The object \"Customer\" does not exist.",
"name": "Test2",
"status": "error"
},
…
]
}
}
7. Close the instance
To close the instance, use the operation DELETE /instances/{id}. It will unload TestComplete (or TestExecute) from memory and close the interactive user session TestComplete Service created to run your tests.
curl -u DOMAIN\user:password -X DELETE https://tchost:1880/1/instances/15743972
If needed, you can also delete your project suite from the remote computer:
curl -u DOMAIN\user:password -X DELETE https://tchost:1880/1/suites/12345
To Disable the API
By using a batch file
The batch file is shipped with TestComplete (and TestExecute) and resides in the product folder.
-
Log in to your test host.
-
Locate the batch file and run it as administrator:
<TestComplete 15>\Bin\TestCompleteService14RestApiDisable.bat
The batch file will disable the API, restart TestComplete Service and will close automatically.
Manually, by using the Windows registry
-
Log in to your test host.
-
Launch the Registry editor (regedit.exe).
-
Locate one of the following Registry keys (depending on whether your computer is running under a 32-bit or 64-bit operating system):
On the 64-bit version of Windows:
HKEY_LOCAL_MACHINE\SOFTWARE\Wow6432Node\SmartBear\TestCompleteService\15.0On the 32-bit version of Windows:
HKEY_LOCAL_MACHINE\SOFTWARE\SmartBear\TestCompleteService\15.0 -
Locate the
RestAPIEnabledvalue and set it to 0. -
For the changes to come into effect, restart TestComplete Service running on the test host.

 See instructions


